DreamzCMMS AI Take Off Software: From Drawings to Quotation
Estimating a construction project the traditional way means hours spent scrolling through PDF drawings, manually counting fixtures, outlets, and equipment one page at a time — and every hour spent counting is an hour not spent bidding, building, or winning the next job. The AI-based Take Off application, built directly into DreamzCMMS, puts artificial intelligence to work on the slowest, most error-prone part of estimating: the takeoff itself.
Overview
Upload a set of drawings or a floor/site area, and the system automatically detects and counts the items that matter — electrical devices, plumbing fixtures, HVAC equipment, and more. Your team reviews, quality-checks, and approves the result, then sends the numbers straight into a quotation, all without leaving one connected platform: from a scanned drawing or a satellite view of a site, to an AI-generated takeoff, to a human-verified QA approval, to a quotation ready to send.
Here is a reference video:
Before You Begin
- You must have access to the AI Takeoff Software from within DreamzCMMS — log in and click into the AI Takeoff application to get started.
- Have your plan files ready (PDF, PNG, JPG, or TIFF) for drawing-based takeoffs, or know the site address/location for aerial takeoffs.
- Know which trade or scope you're estimating (electrical, HVAC, plumbing, fire protection, structural, etc.), since this determines which template and assemblies apply.
The Dashboard
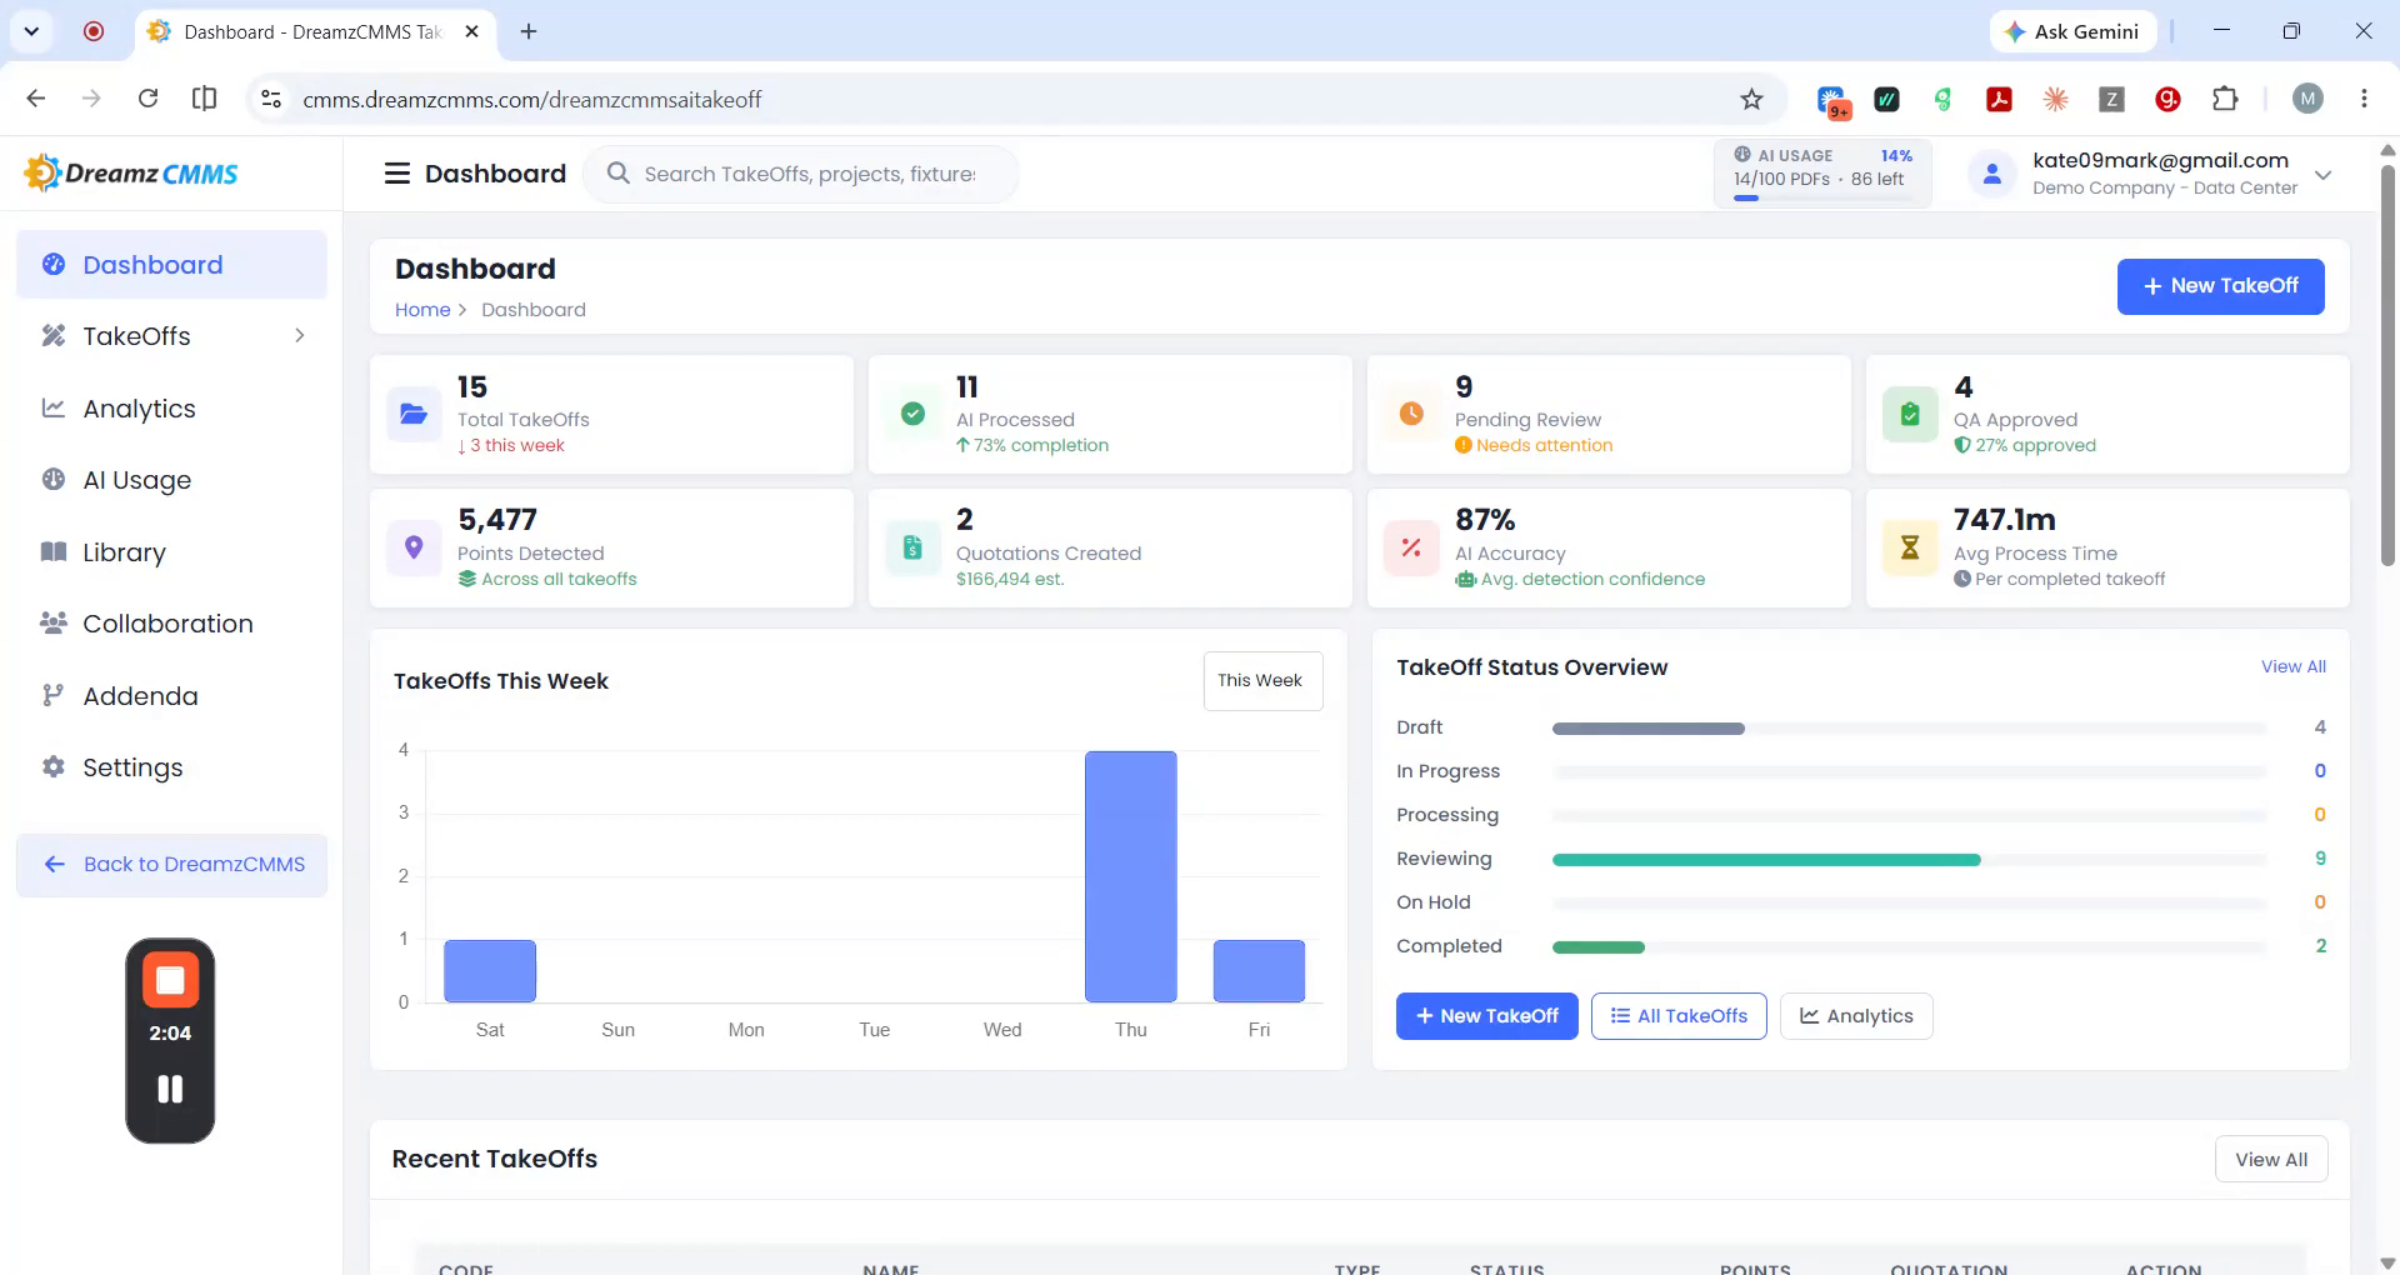
The moment you log in and click on the AI Takeoff Software, you land on the dashboard — a single-screen snapshot of everything happening across your takeoff platform. At the top, eight key numbers give you an at-a-glance view: total takeoffs, AI process pending review, QA approval, points detected, quotations created, AI accuracy, and average process time. A volume-tracking card lets you switch between this week, this month, and this year, while a status overview breaks down every active project by stage — draft, in progress, processing, review, on hold, and complete — so you can spot bottlenecks before they become a problem. Quick action buttons jump you straight to a new takeoff, the full takeoff list, or analytics, and a recent activity feed keeps a running log of what's happening across the team.
The Takeoff List
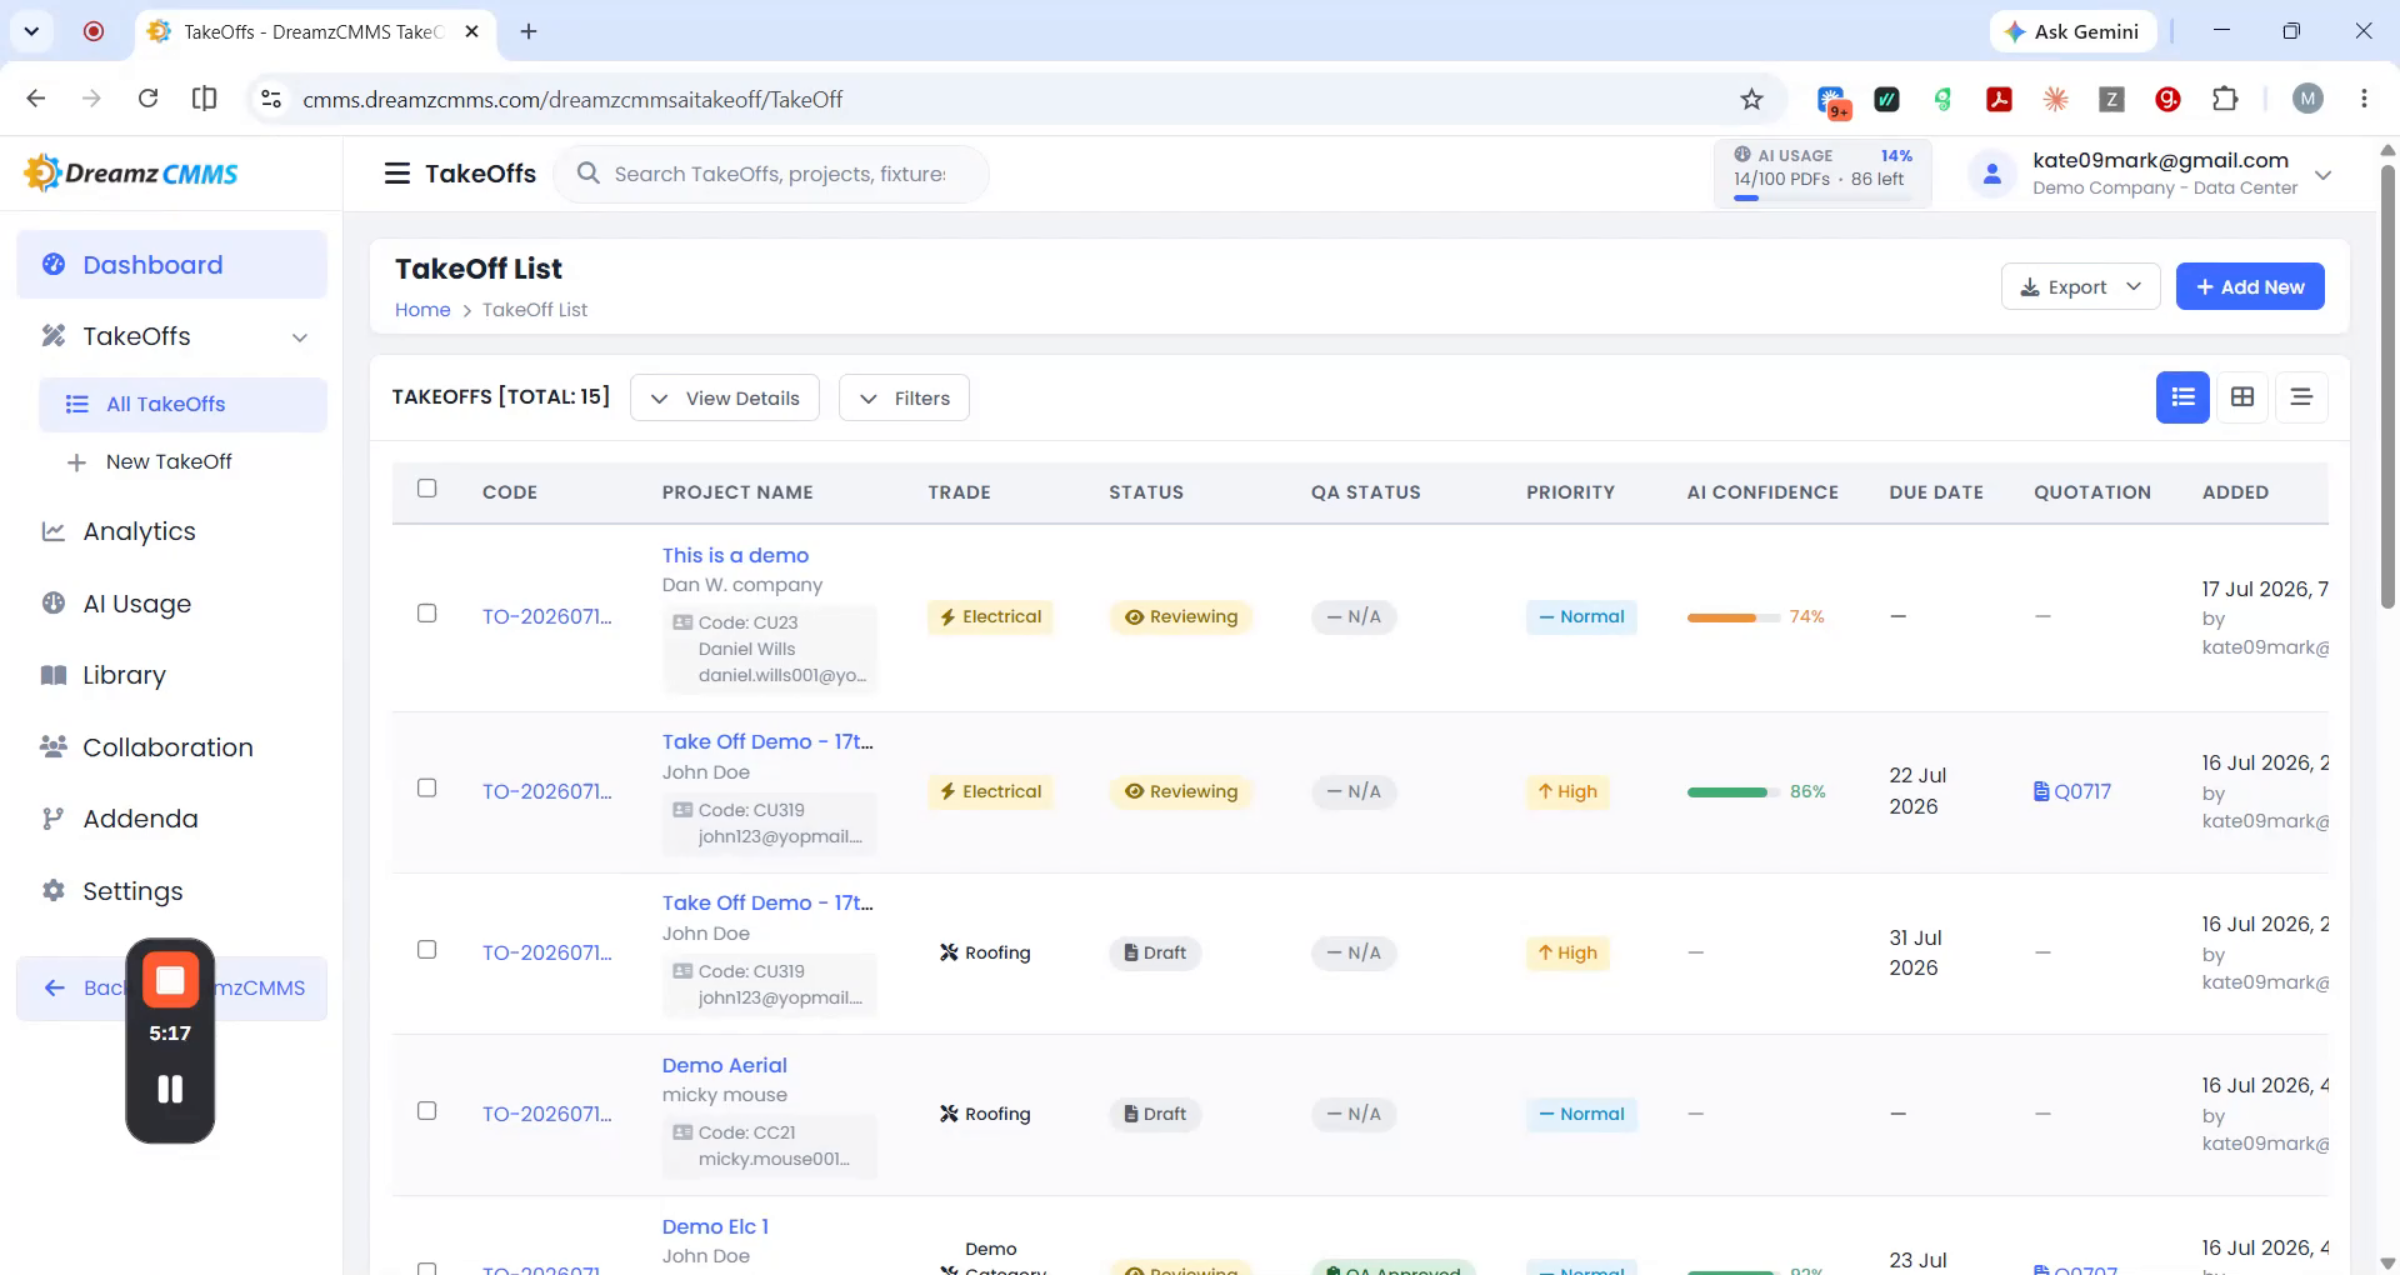
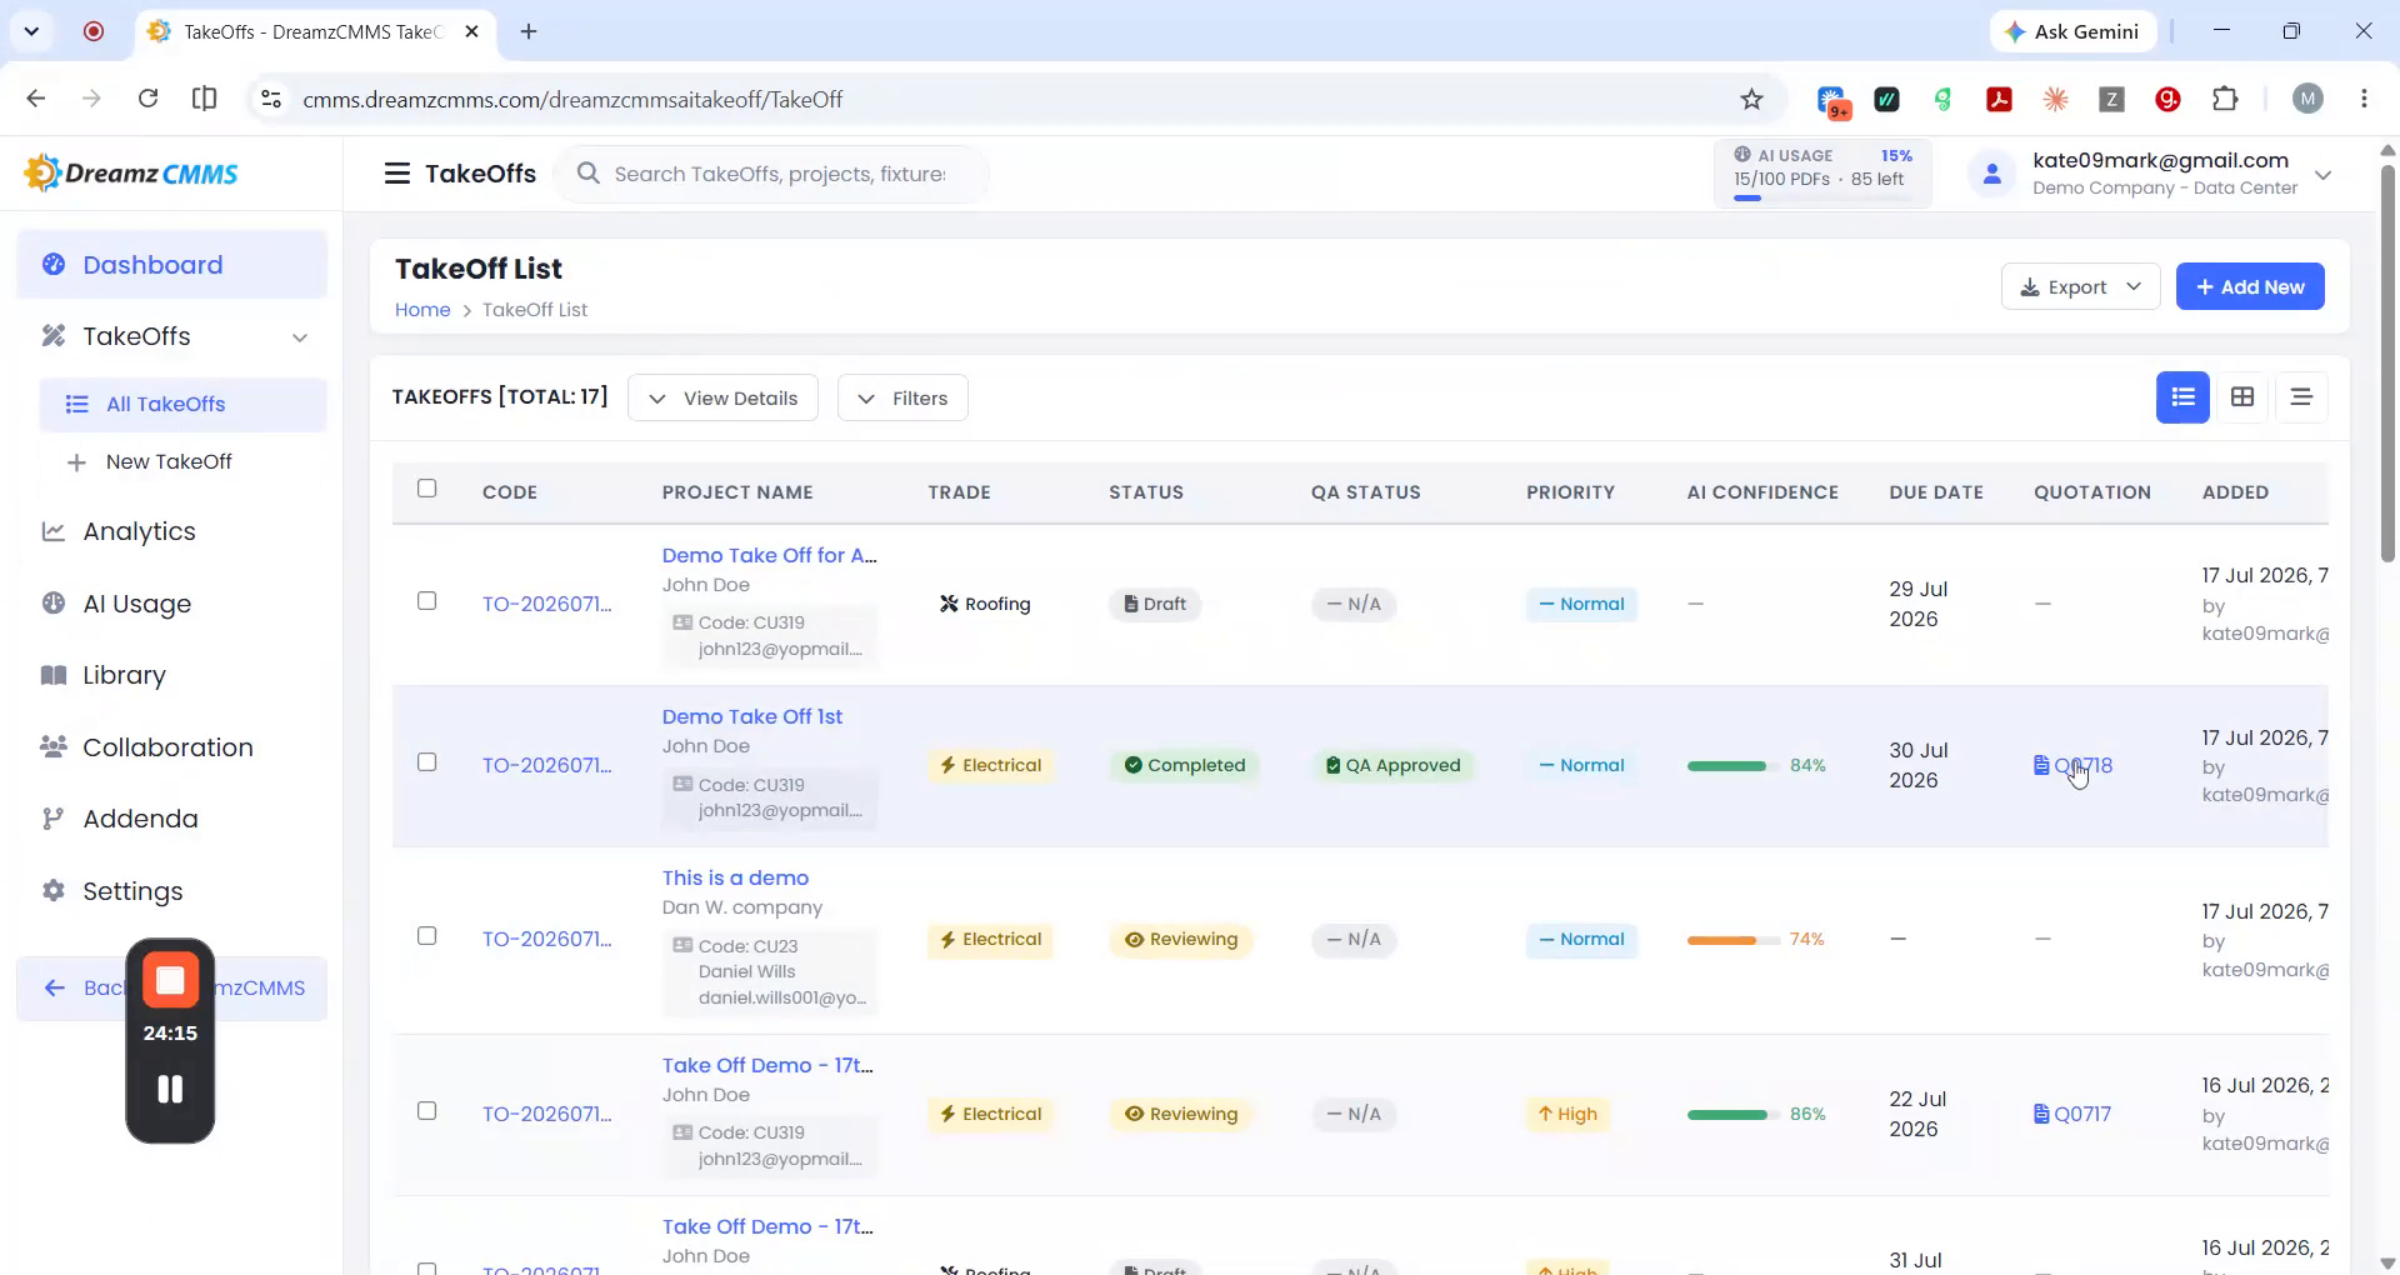
Every project you're working on lives in the takeoff list, which you can view three ways depending on how you like to work. The table view gives you full detail in a dense, sortable grid: project name, project code, client information, type, trade, QA status, priority, AI confidence, due date, and whether a quotation has been added — along with a direct link to create one. The card view switches to a visual tile layout, great for scanning quickly on a tablet, and the timeline view lays your projects out chronologically. A filter bar above the list lets you narrow by status, QA status, trade, priority, and date range, and a "View Details" option shows counts by status, QA status, trade, and priority. From here you can also export the list to Excel or PDF, or start a new takeoff with the Add New button.
How to Create a Takeoff from a Plan File
Step 1 – Enter Project Information
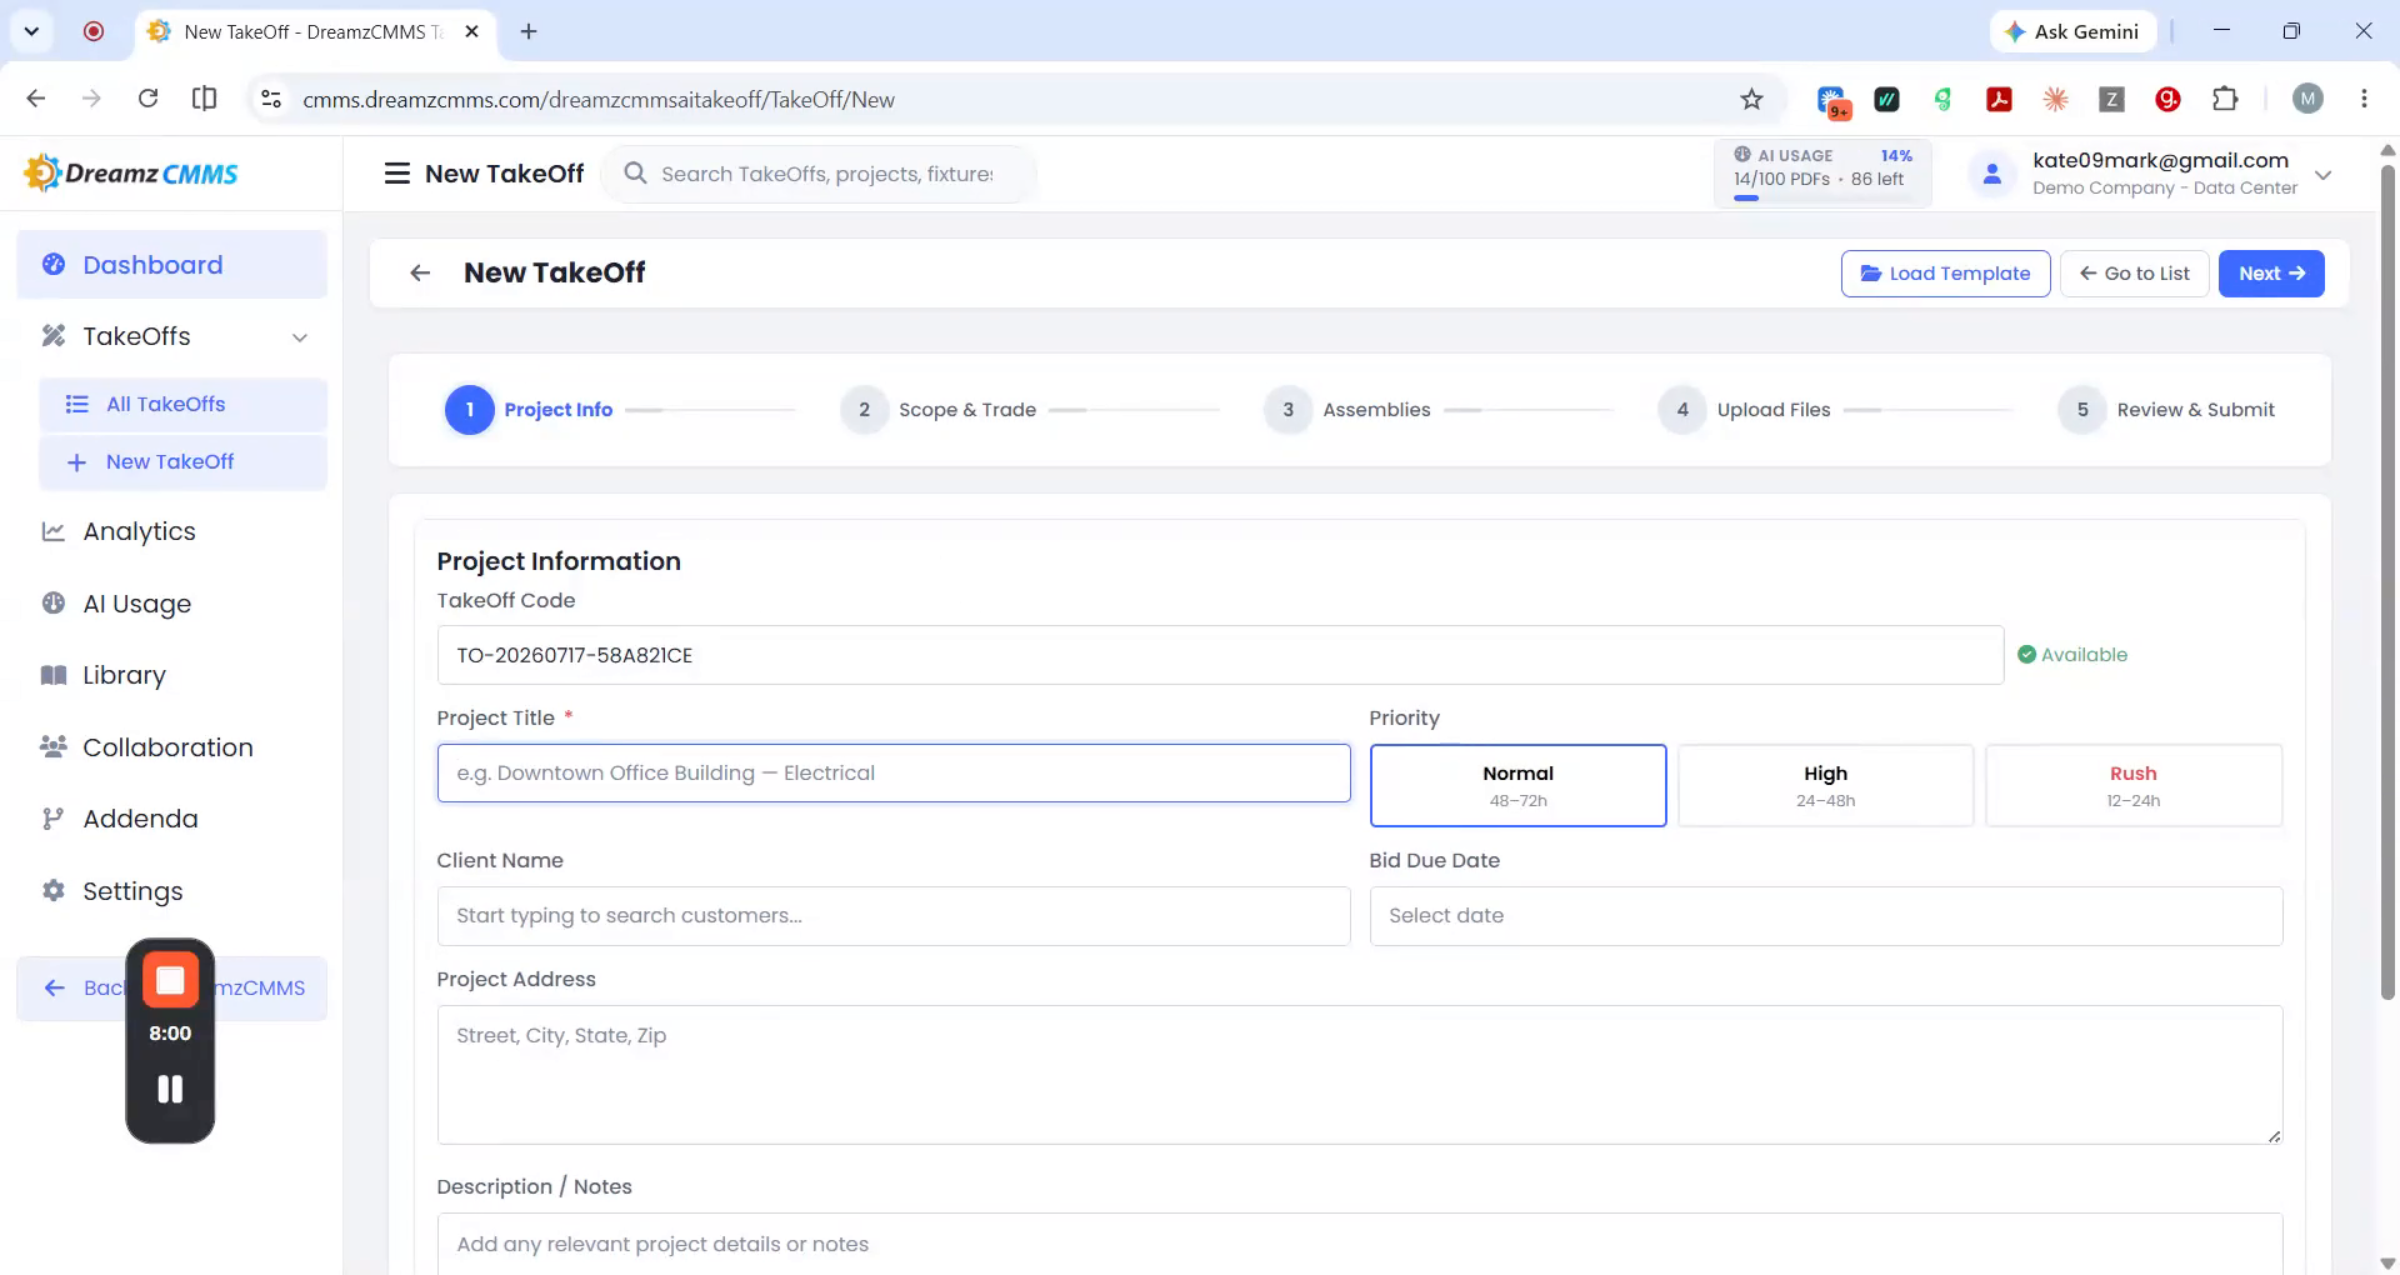
Creating a new takeoff is a guided five-step wizard. On the first screen, enter the project title, select a priority (high, normal, high-end, or rush), select the customer, choose a bidding date, and add any additional description if needed.
Step 2 – Select Scope, Templates, and AI Settings
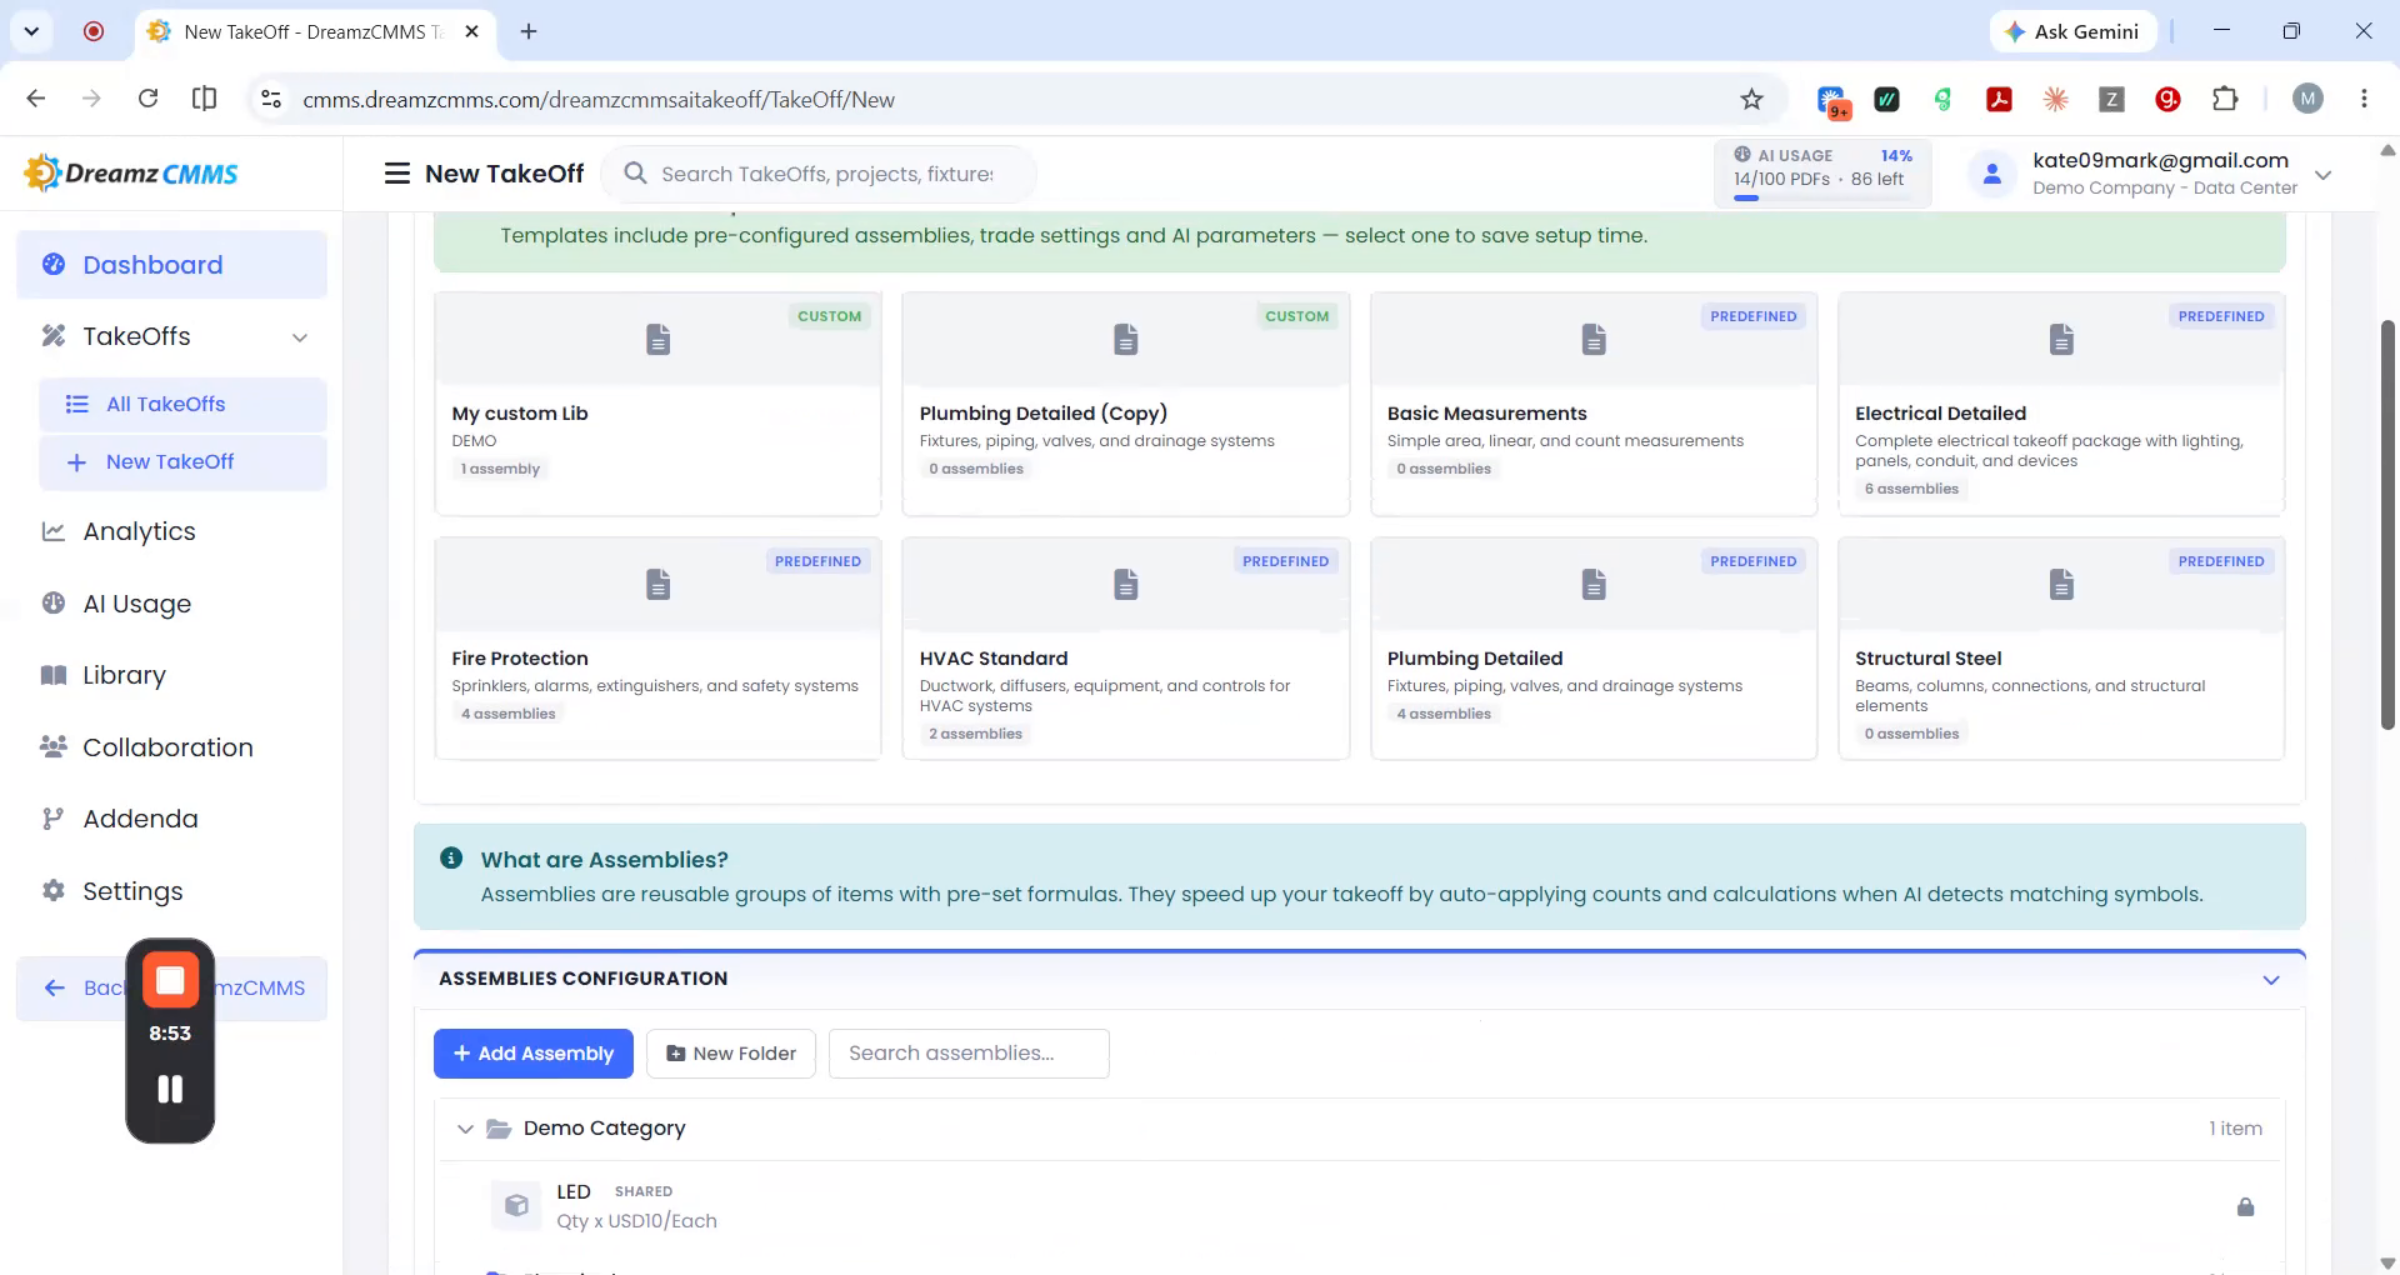
Next, select the scope or trade — single or multiple trades, such as electrical. You'll then see the template library, with predefined and custom-created templates and assemblies, plus AI configuration options including measurement settings. You can add any project-specific instructions here as well.
Step 3 – Upload Your Plan File
Select the plan file for your takeoff — you can upload a PDF, PNG, JPG, or TIFF file. (If you're creating an aerial takeoff instead, see the Aerial Takeoff section below.)
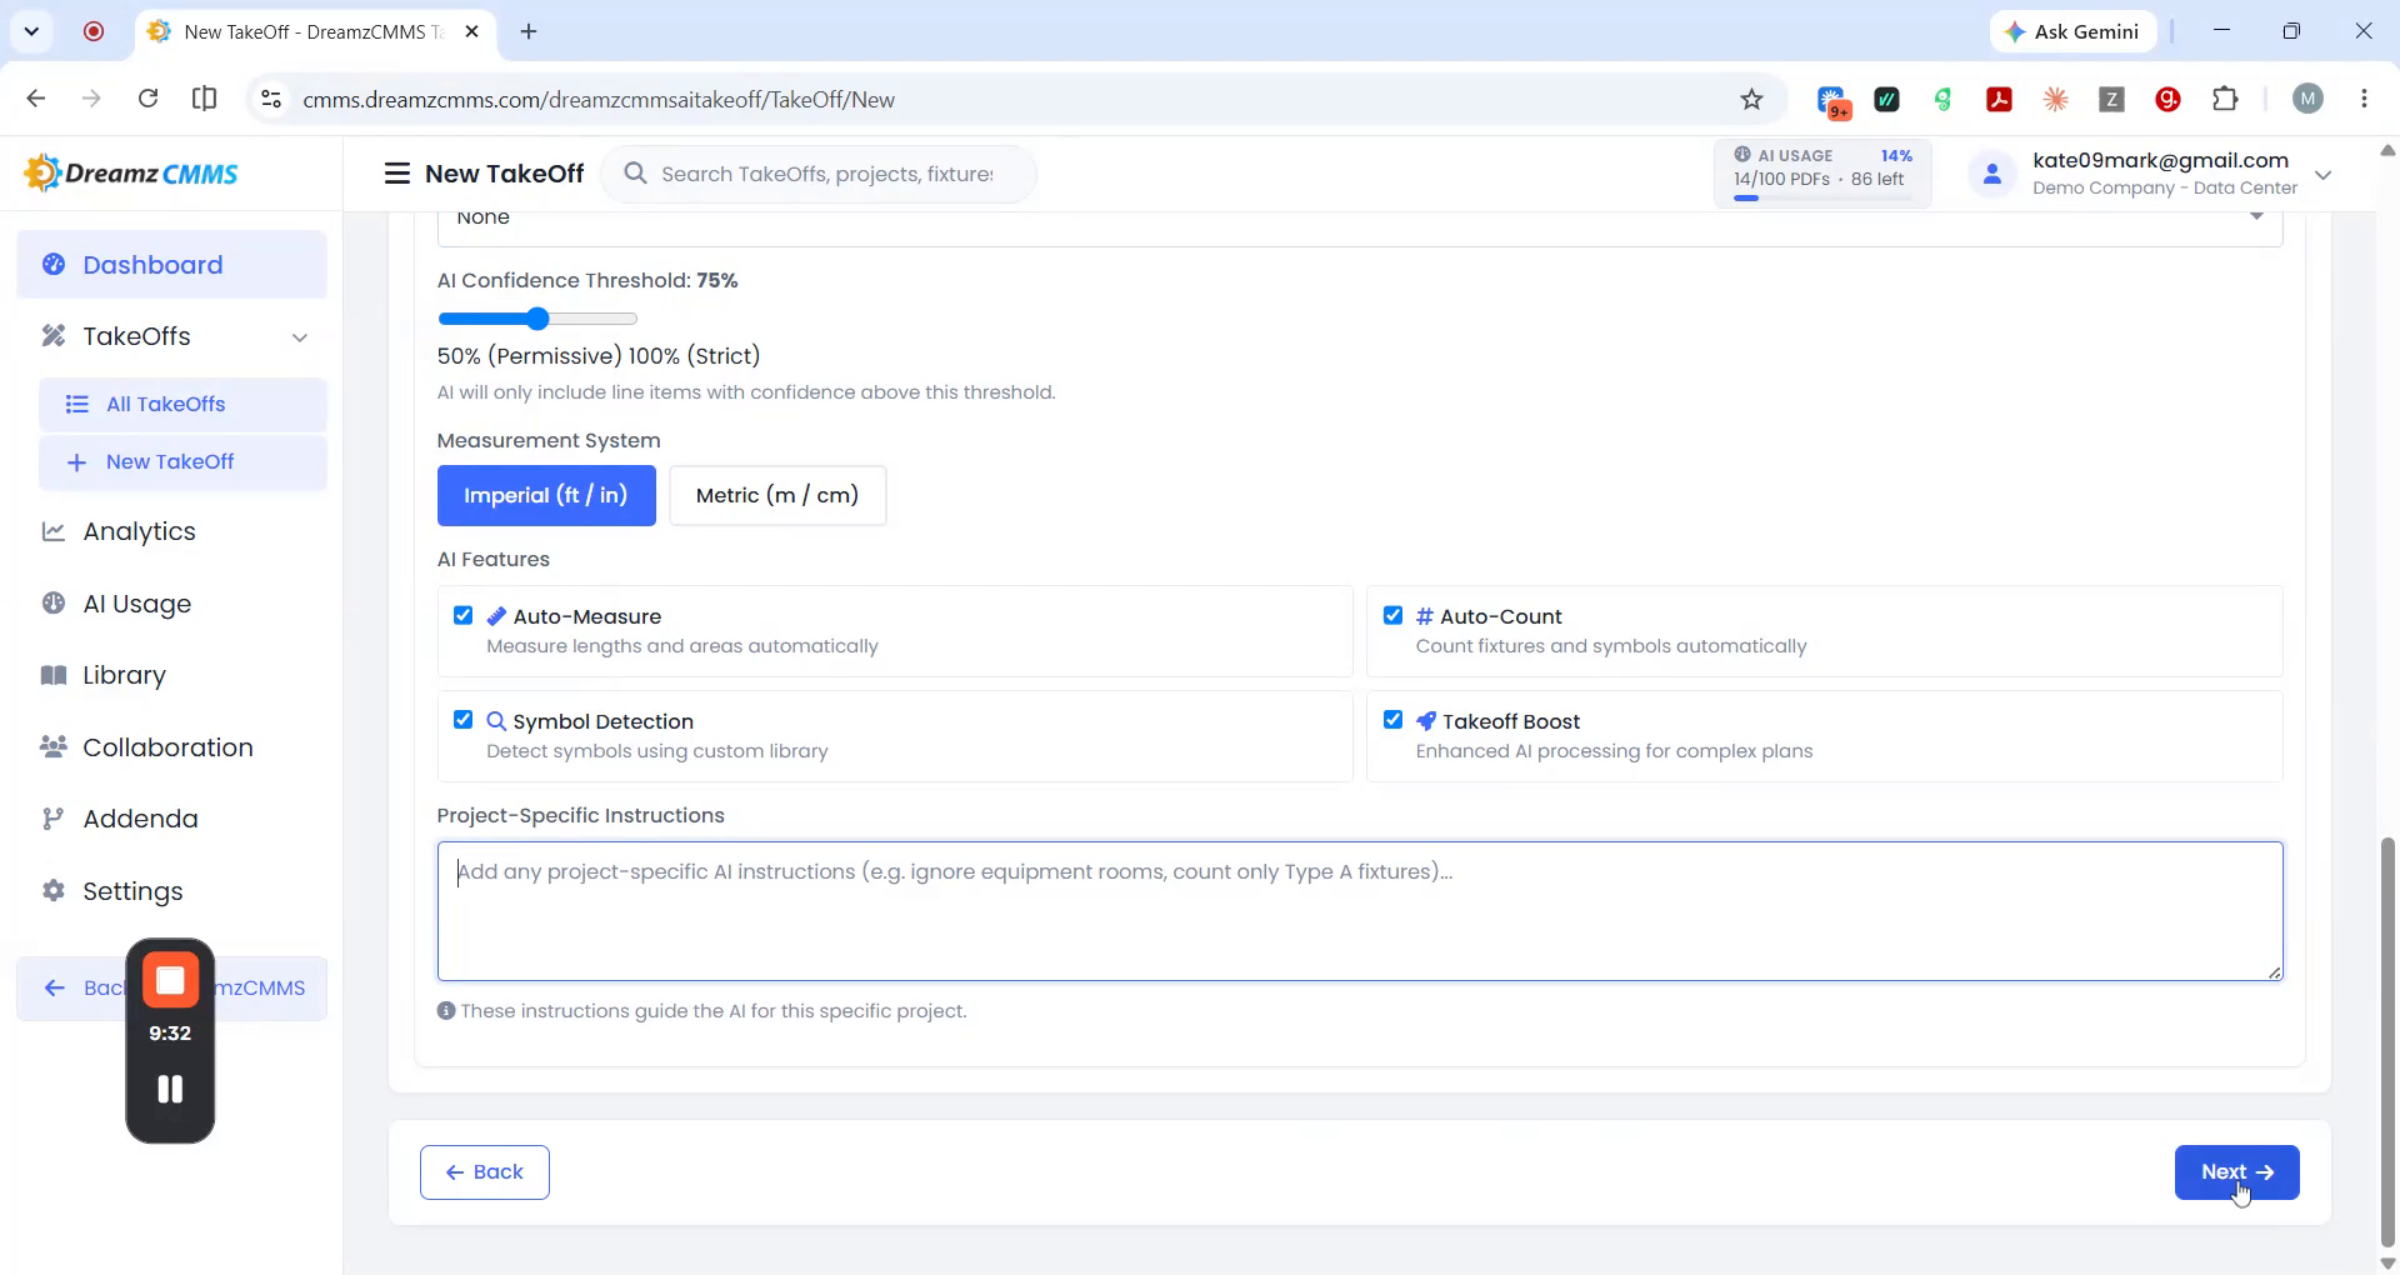
Step 4 – Set Scale, Review, and Submit
Set the scale and calibration for the uploaded drawing, and upload any specific supporting documents if needed. Click Review and Submit to check your information, then click Create Takeoff.
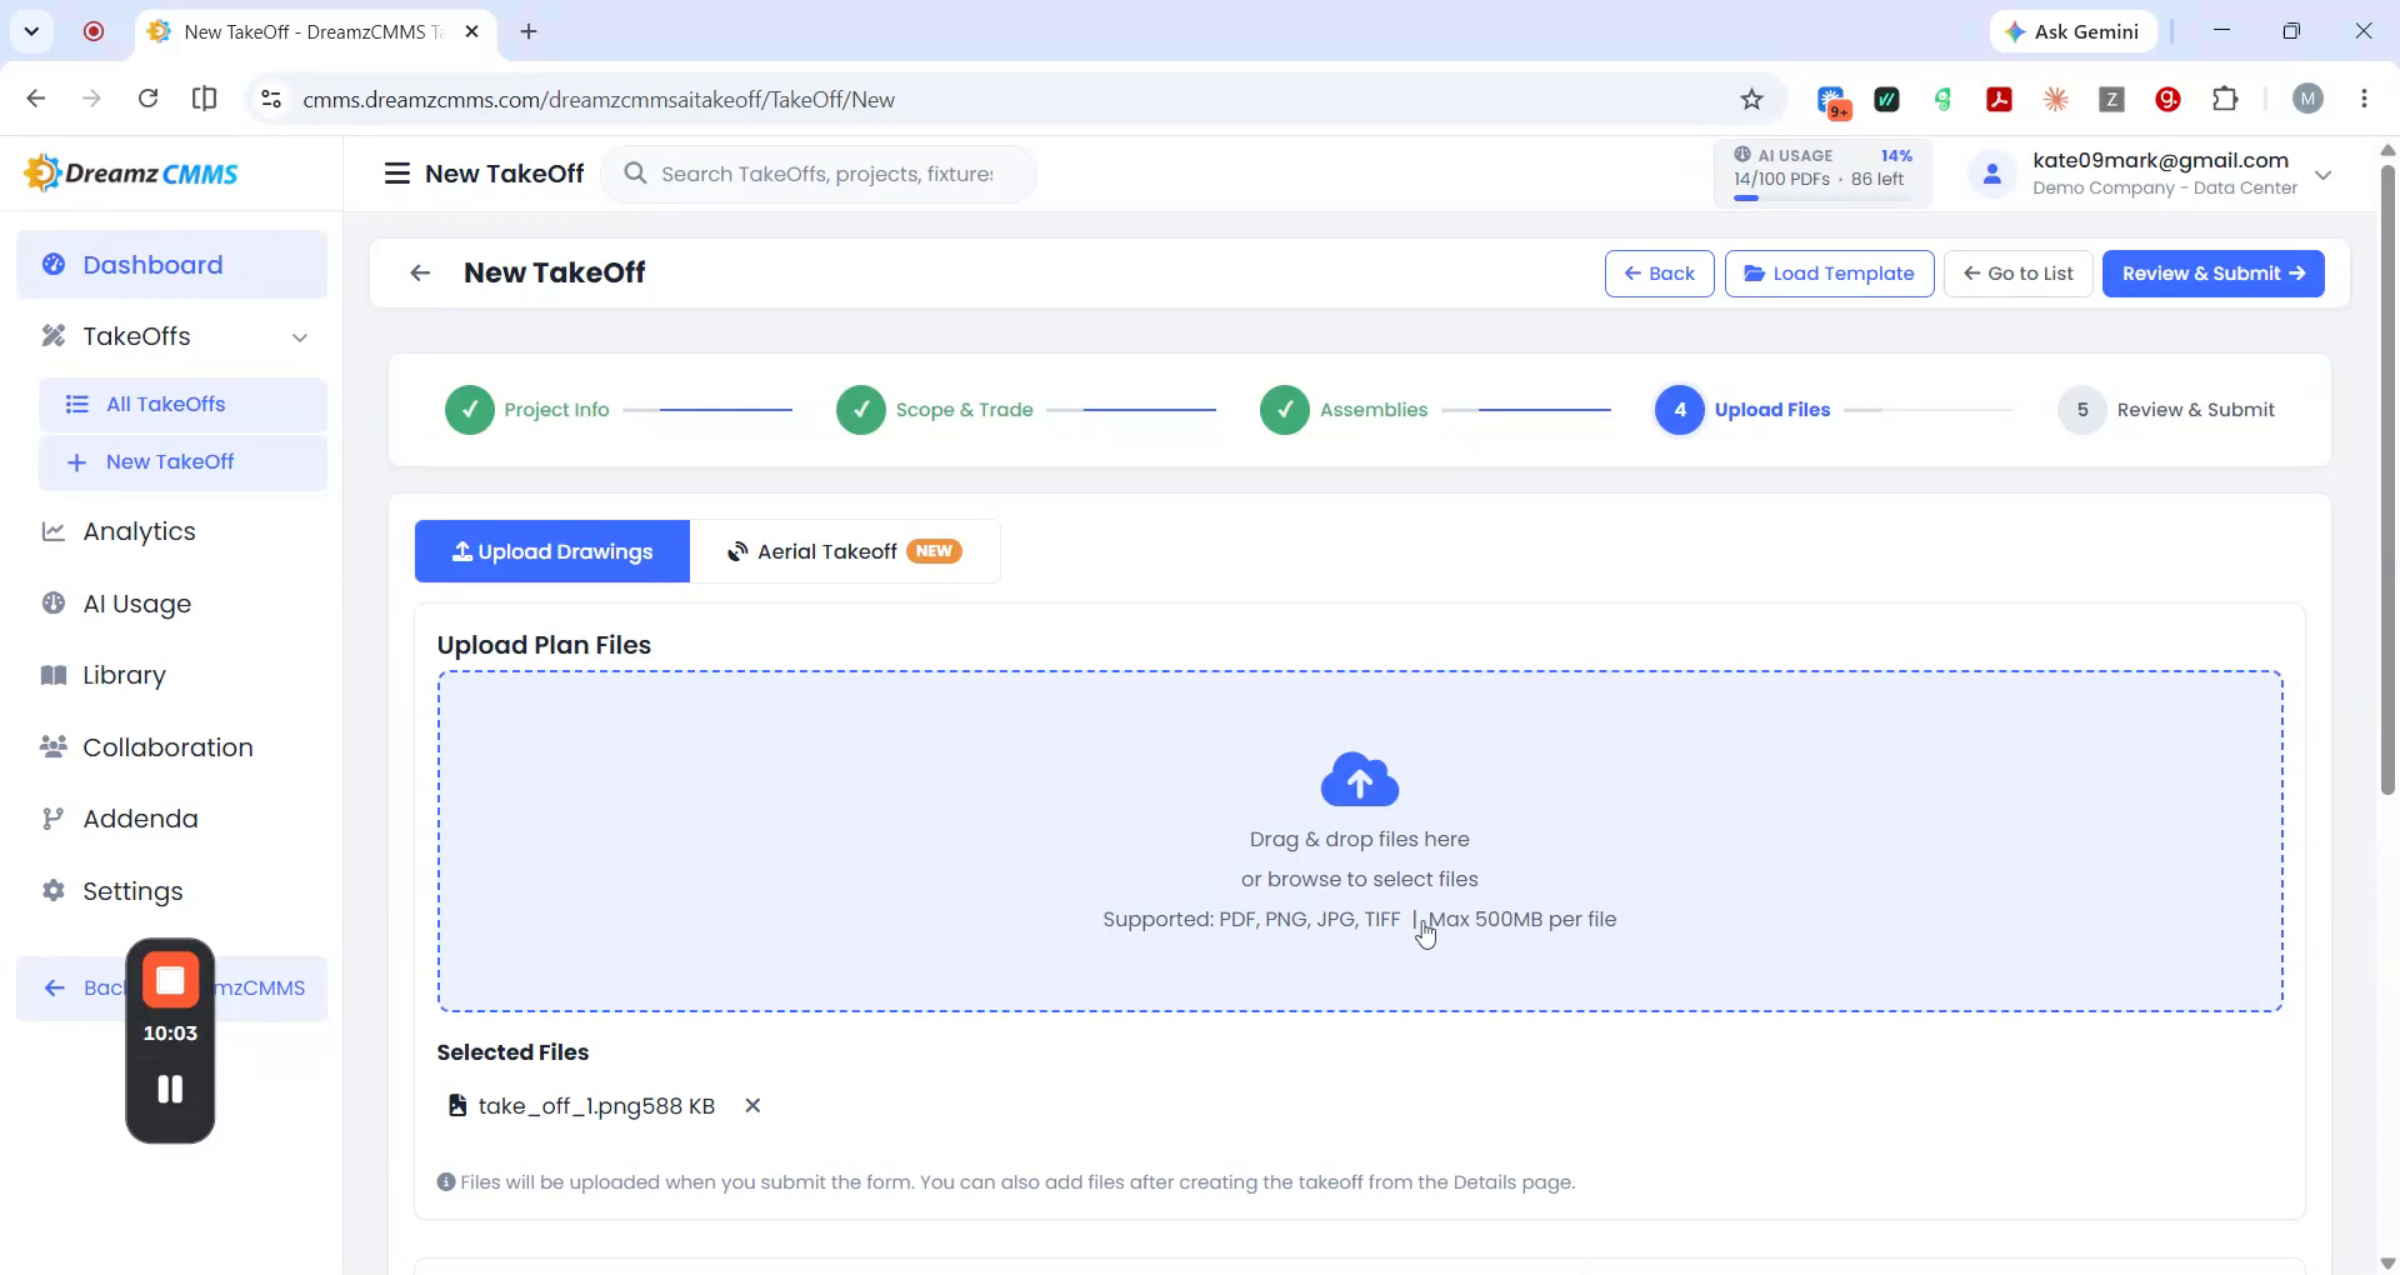
Step 5 – Let the AI Detect Your Points
Note: Once you click Create Takeoff, you're taken to the takeoff detail screen. The takeoff is now created, and the system begins detecting points from the uploaded file automatically.
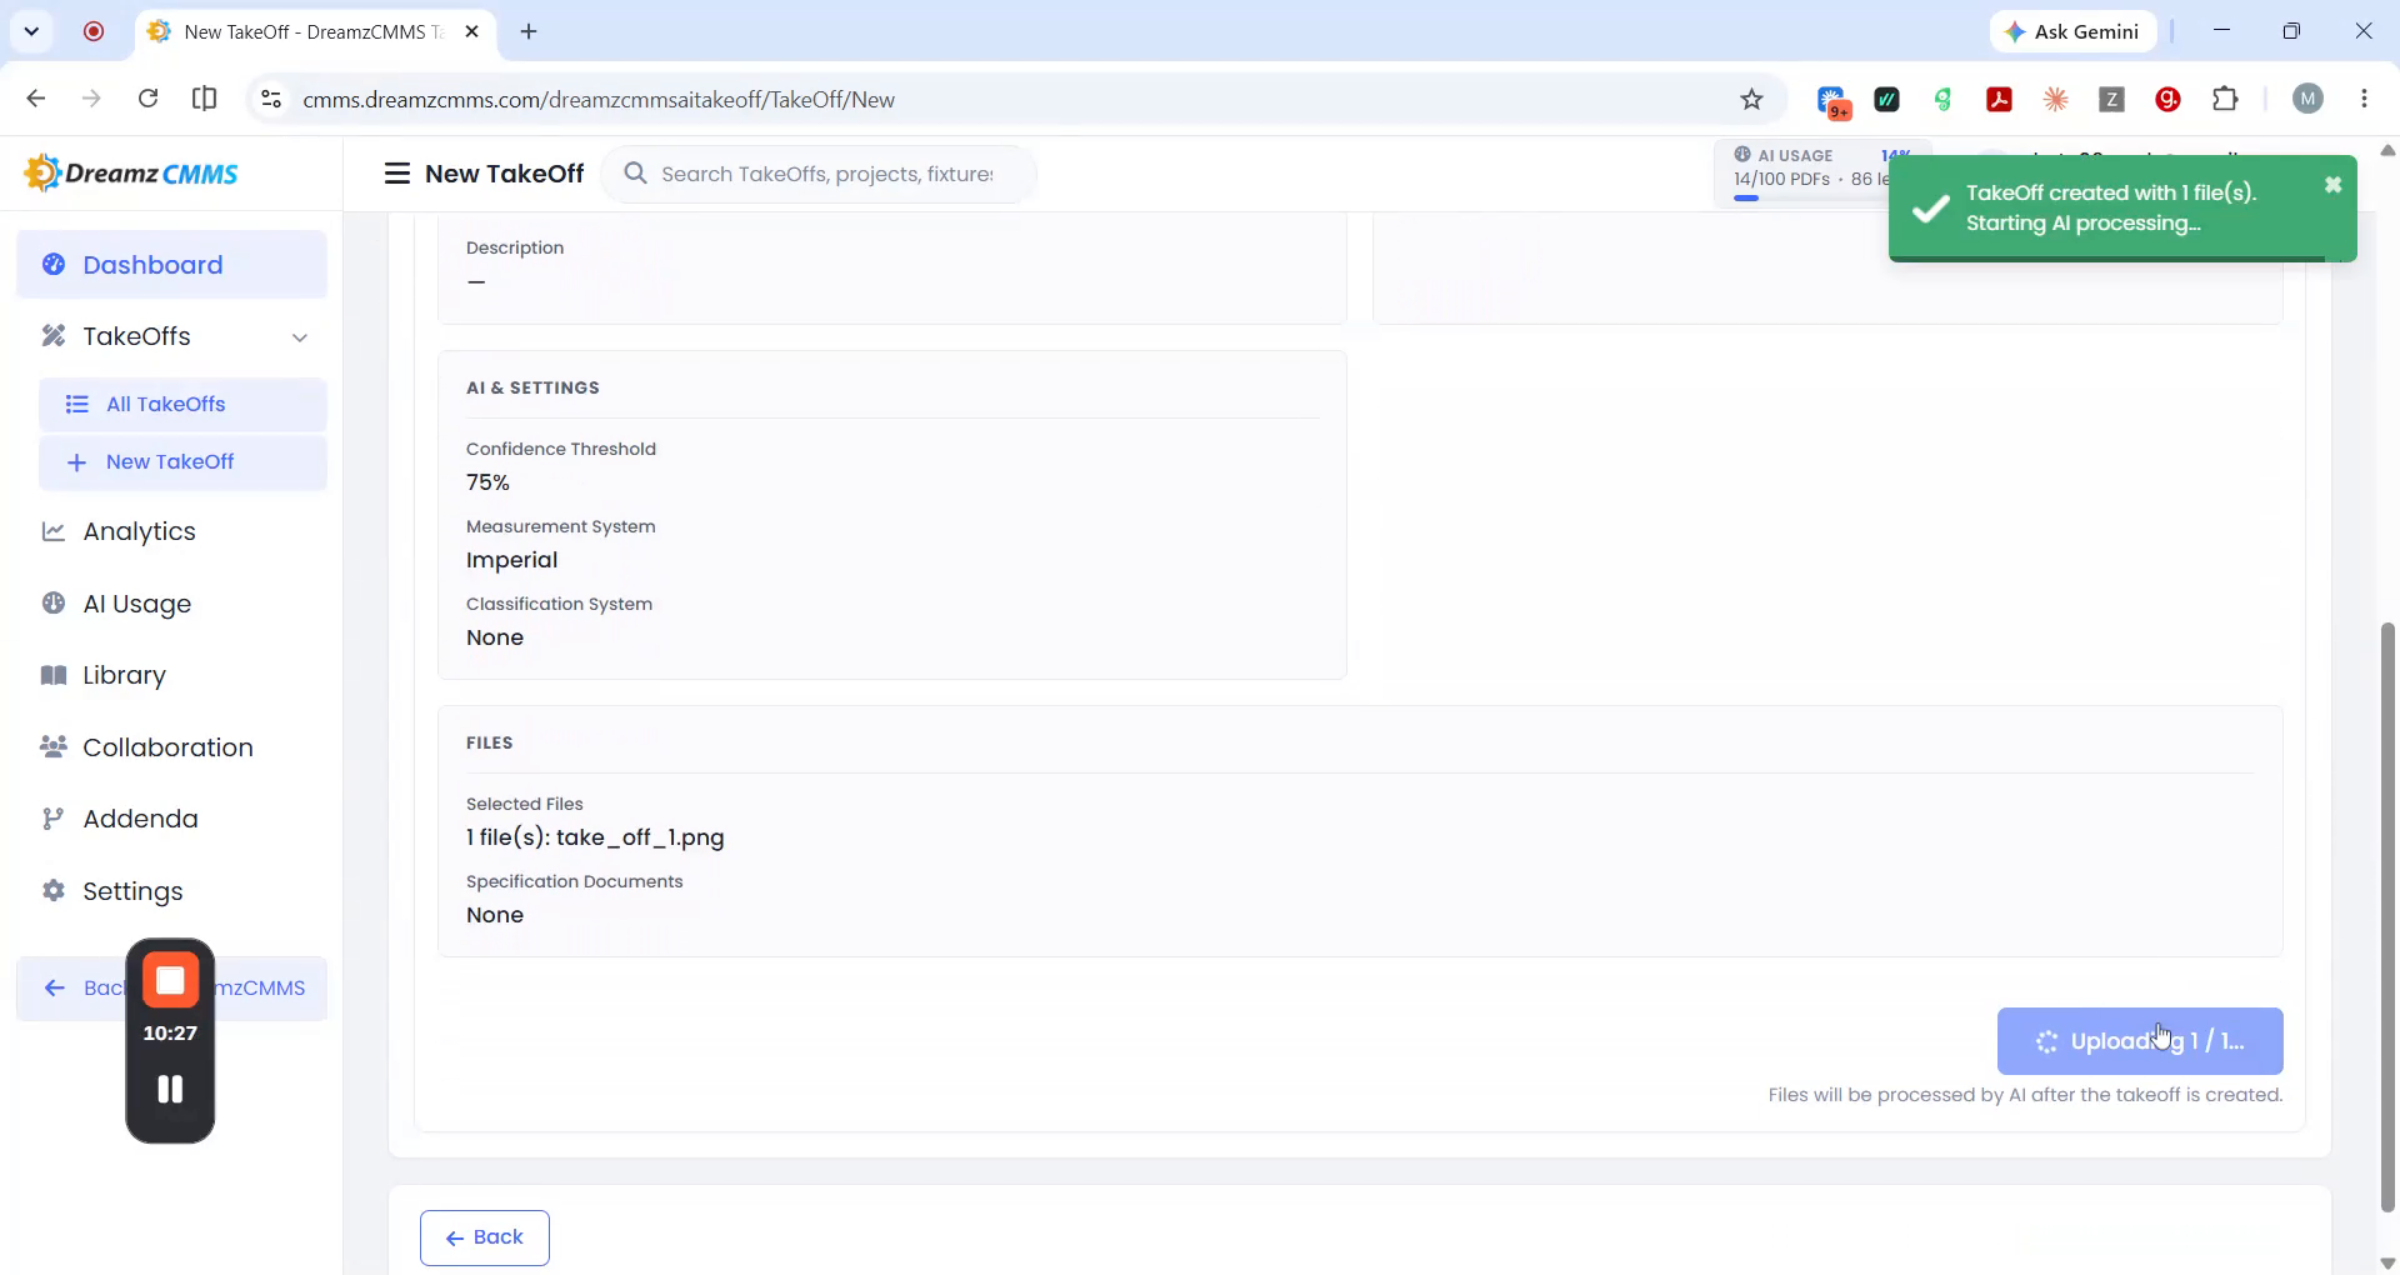
How to Create an Aerial Takeoff
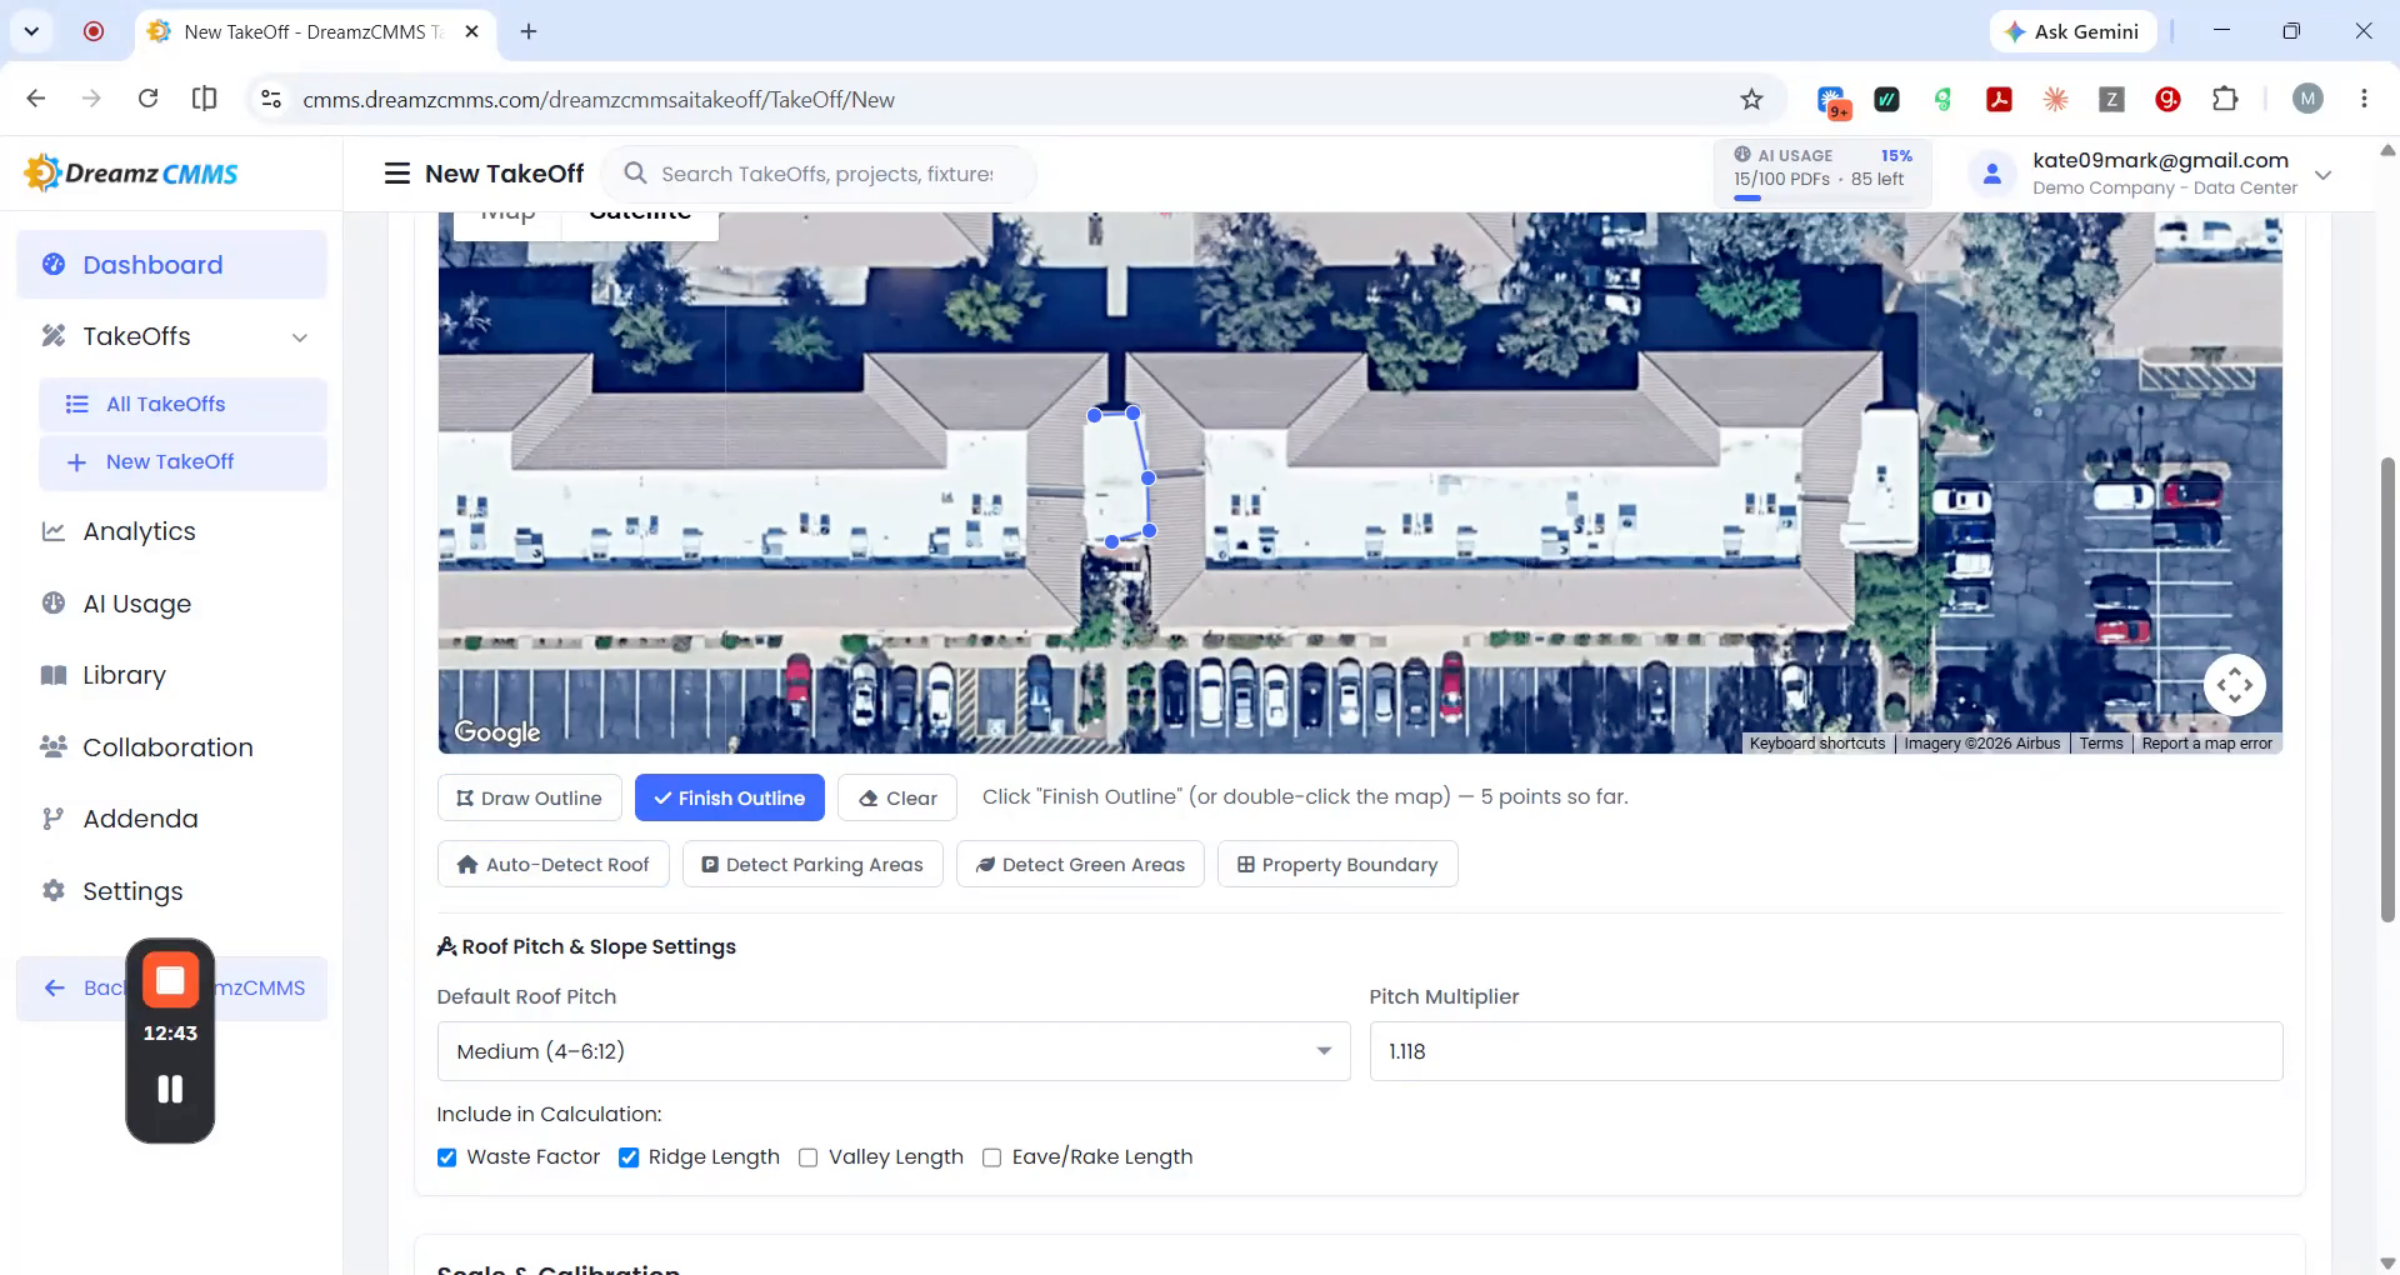
Aerial takeoffs follow a similar wizard, but work from a satellite view instead of an uploaded drawing. Provide a title, select the customer, and optionally add a bidding date. Instead of uploading a file, search for or select the site location directly on the map. From there, you can use Auto Detect Route, zoom in as needed, and draw the outline of the area you want measured.
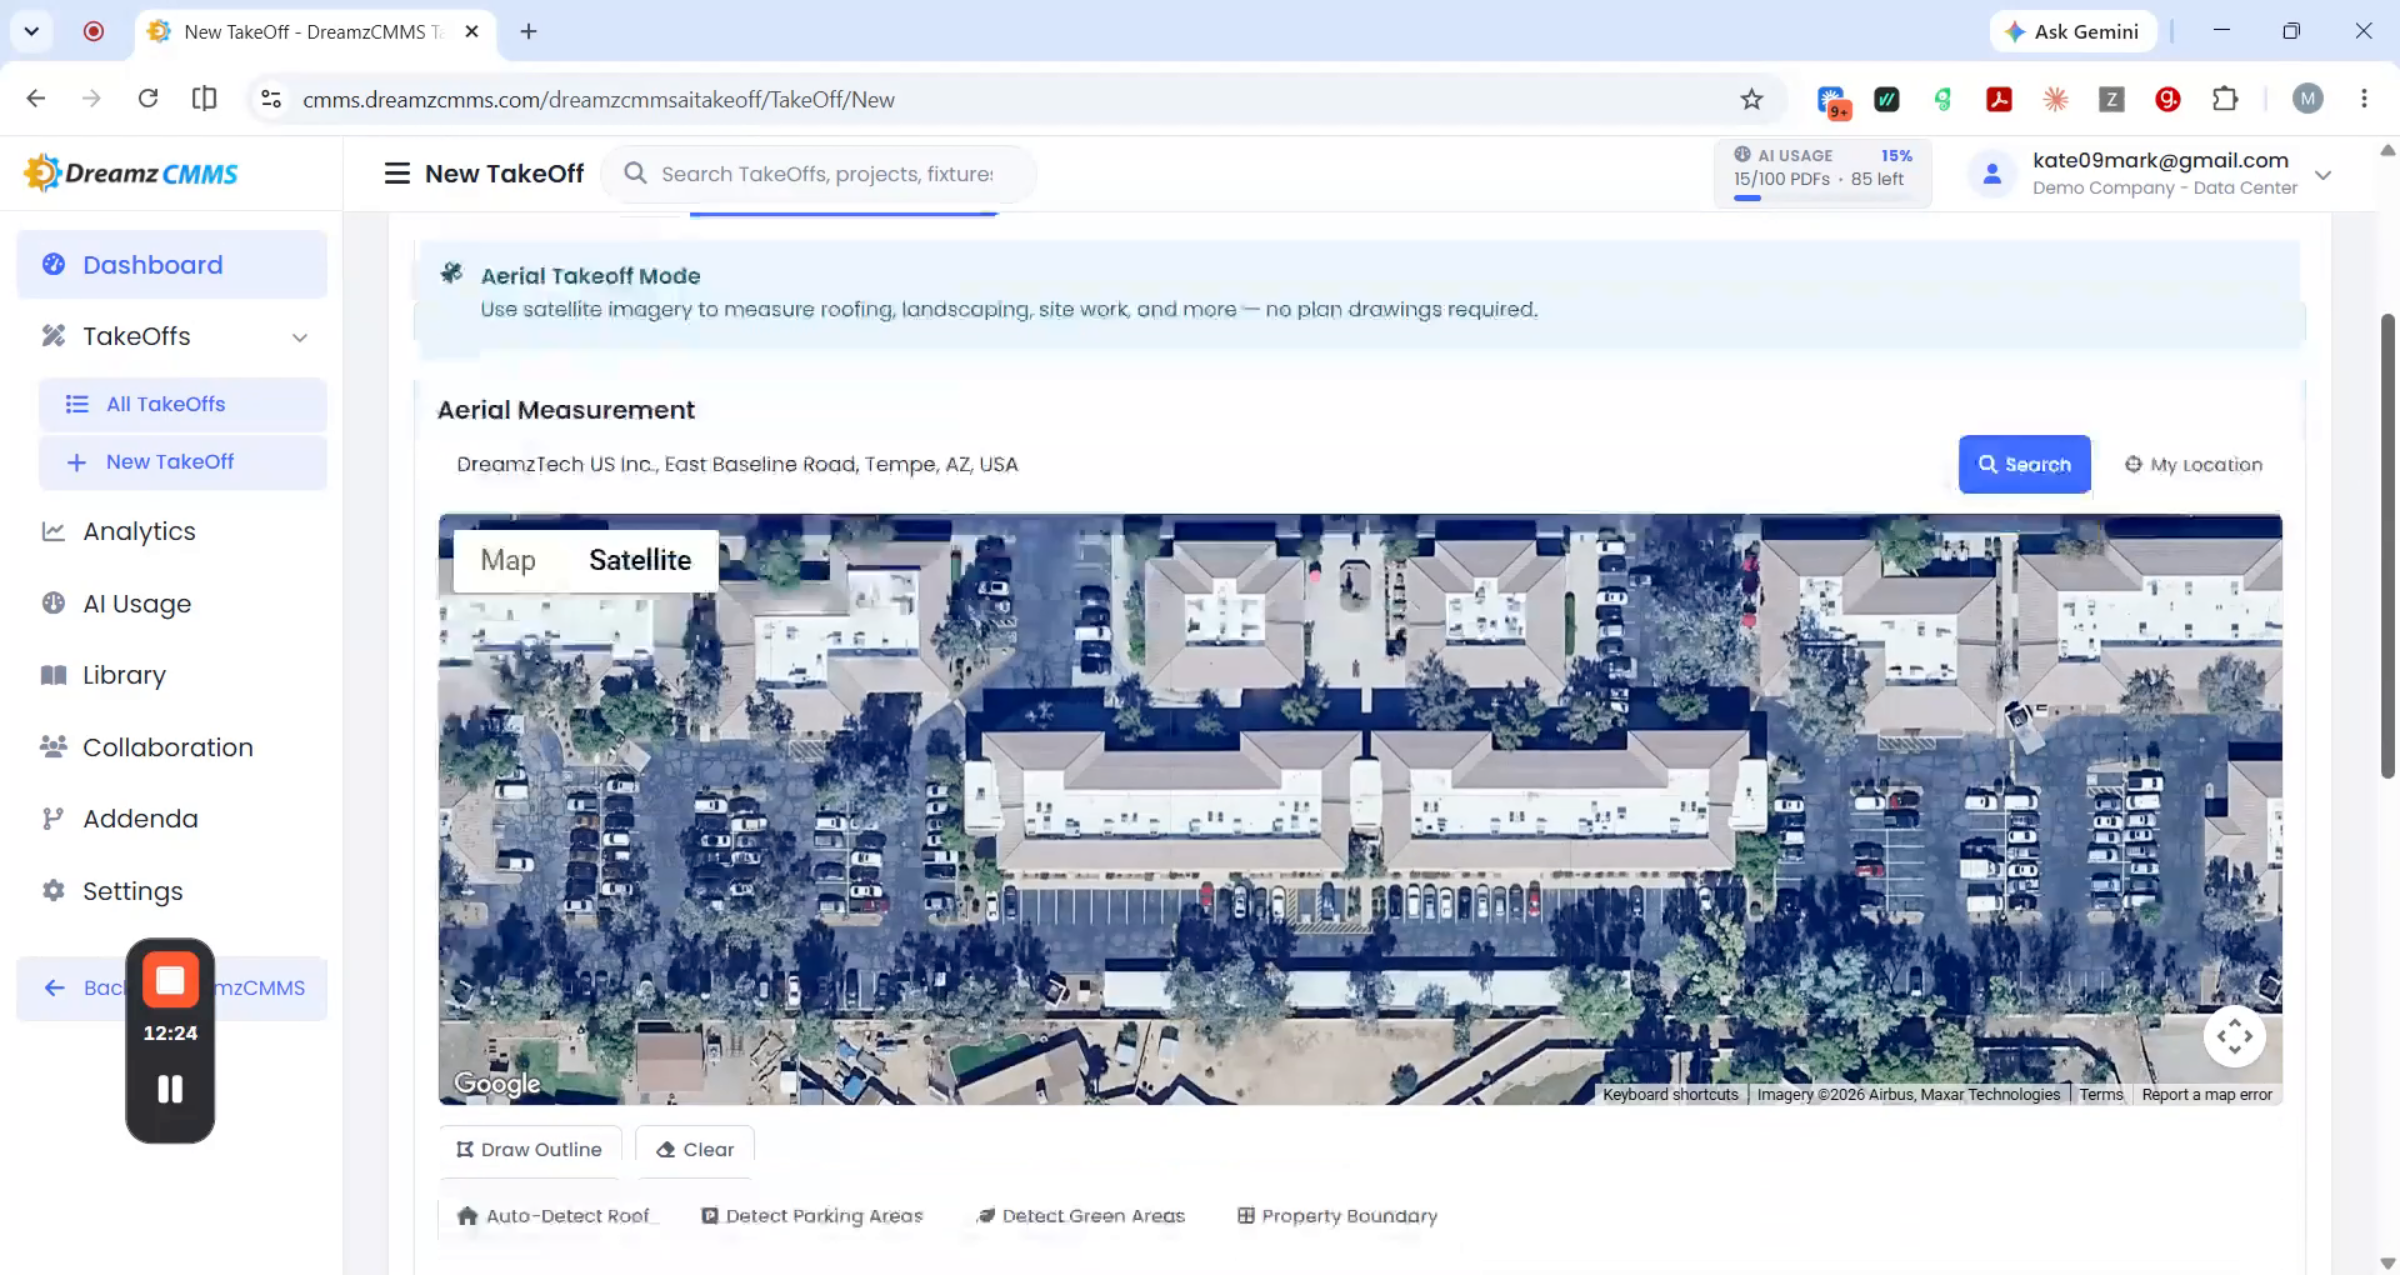
Once your outline is finished, click Finish to see the calculated area and perimeter. The platform also supports Detect Parking Area, Detect Green Area, and Detect Property Boundary, along with route and page-multiplier calculations. Click Review and Submit, then Create Takeoff Using the Aerial View — your takeoff is created and you can view the aerial result, including latitude/longitude, detection type, area, and perimeter.
The Takeoff Detail Page
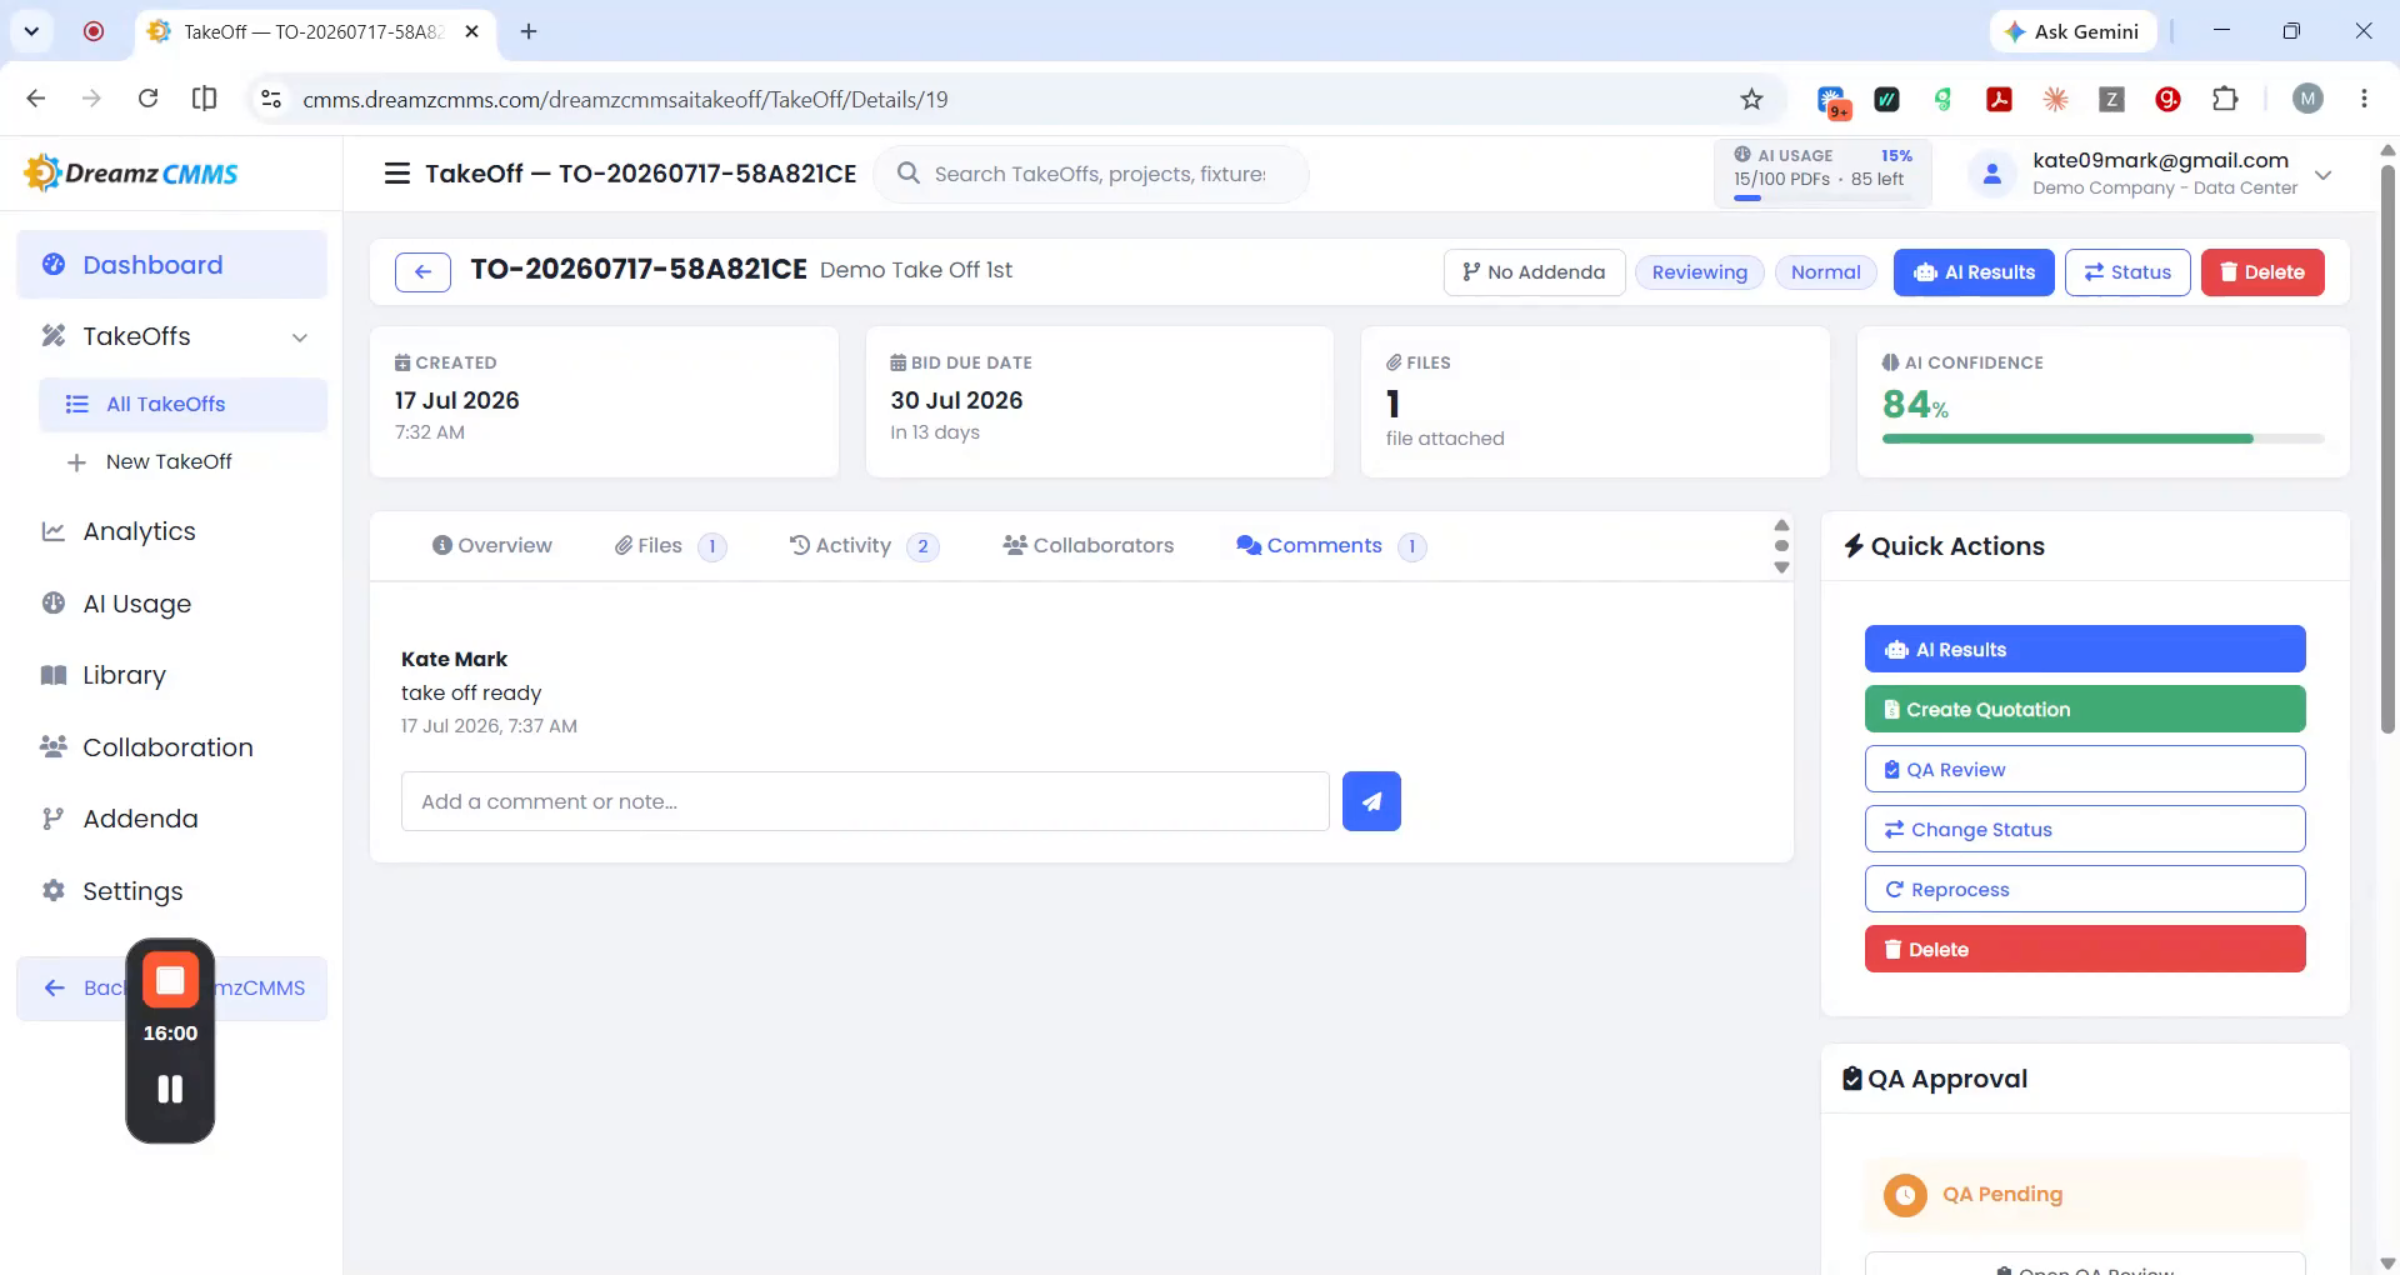
Once a takeoff is created, it has a detail page that acts as its home base, organized into five tabs: Overview (project summary), File (every drawing or image tied to the job), Activity (a full audit trail), Collaborator (who has access), and Comment (where the team discusses the project directly, no separate email thread needed). A Quick Action panel on the right gives one-click access to the AI result, Create Quotation, QA review, status changes, reprocessing, or deletion.
Reviewing the AI Result
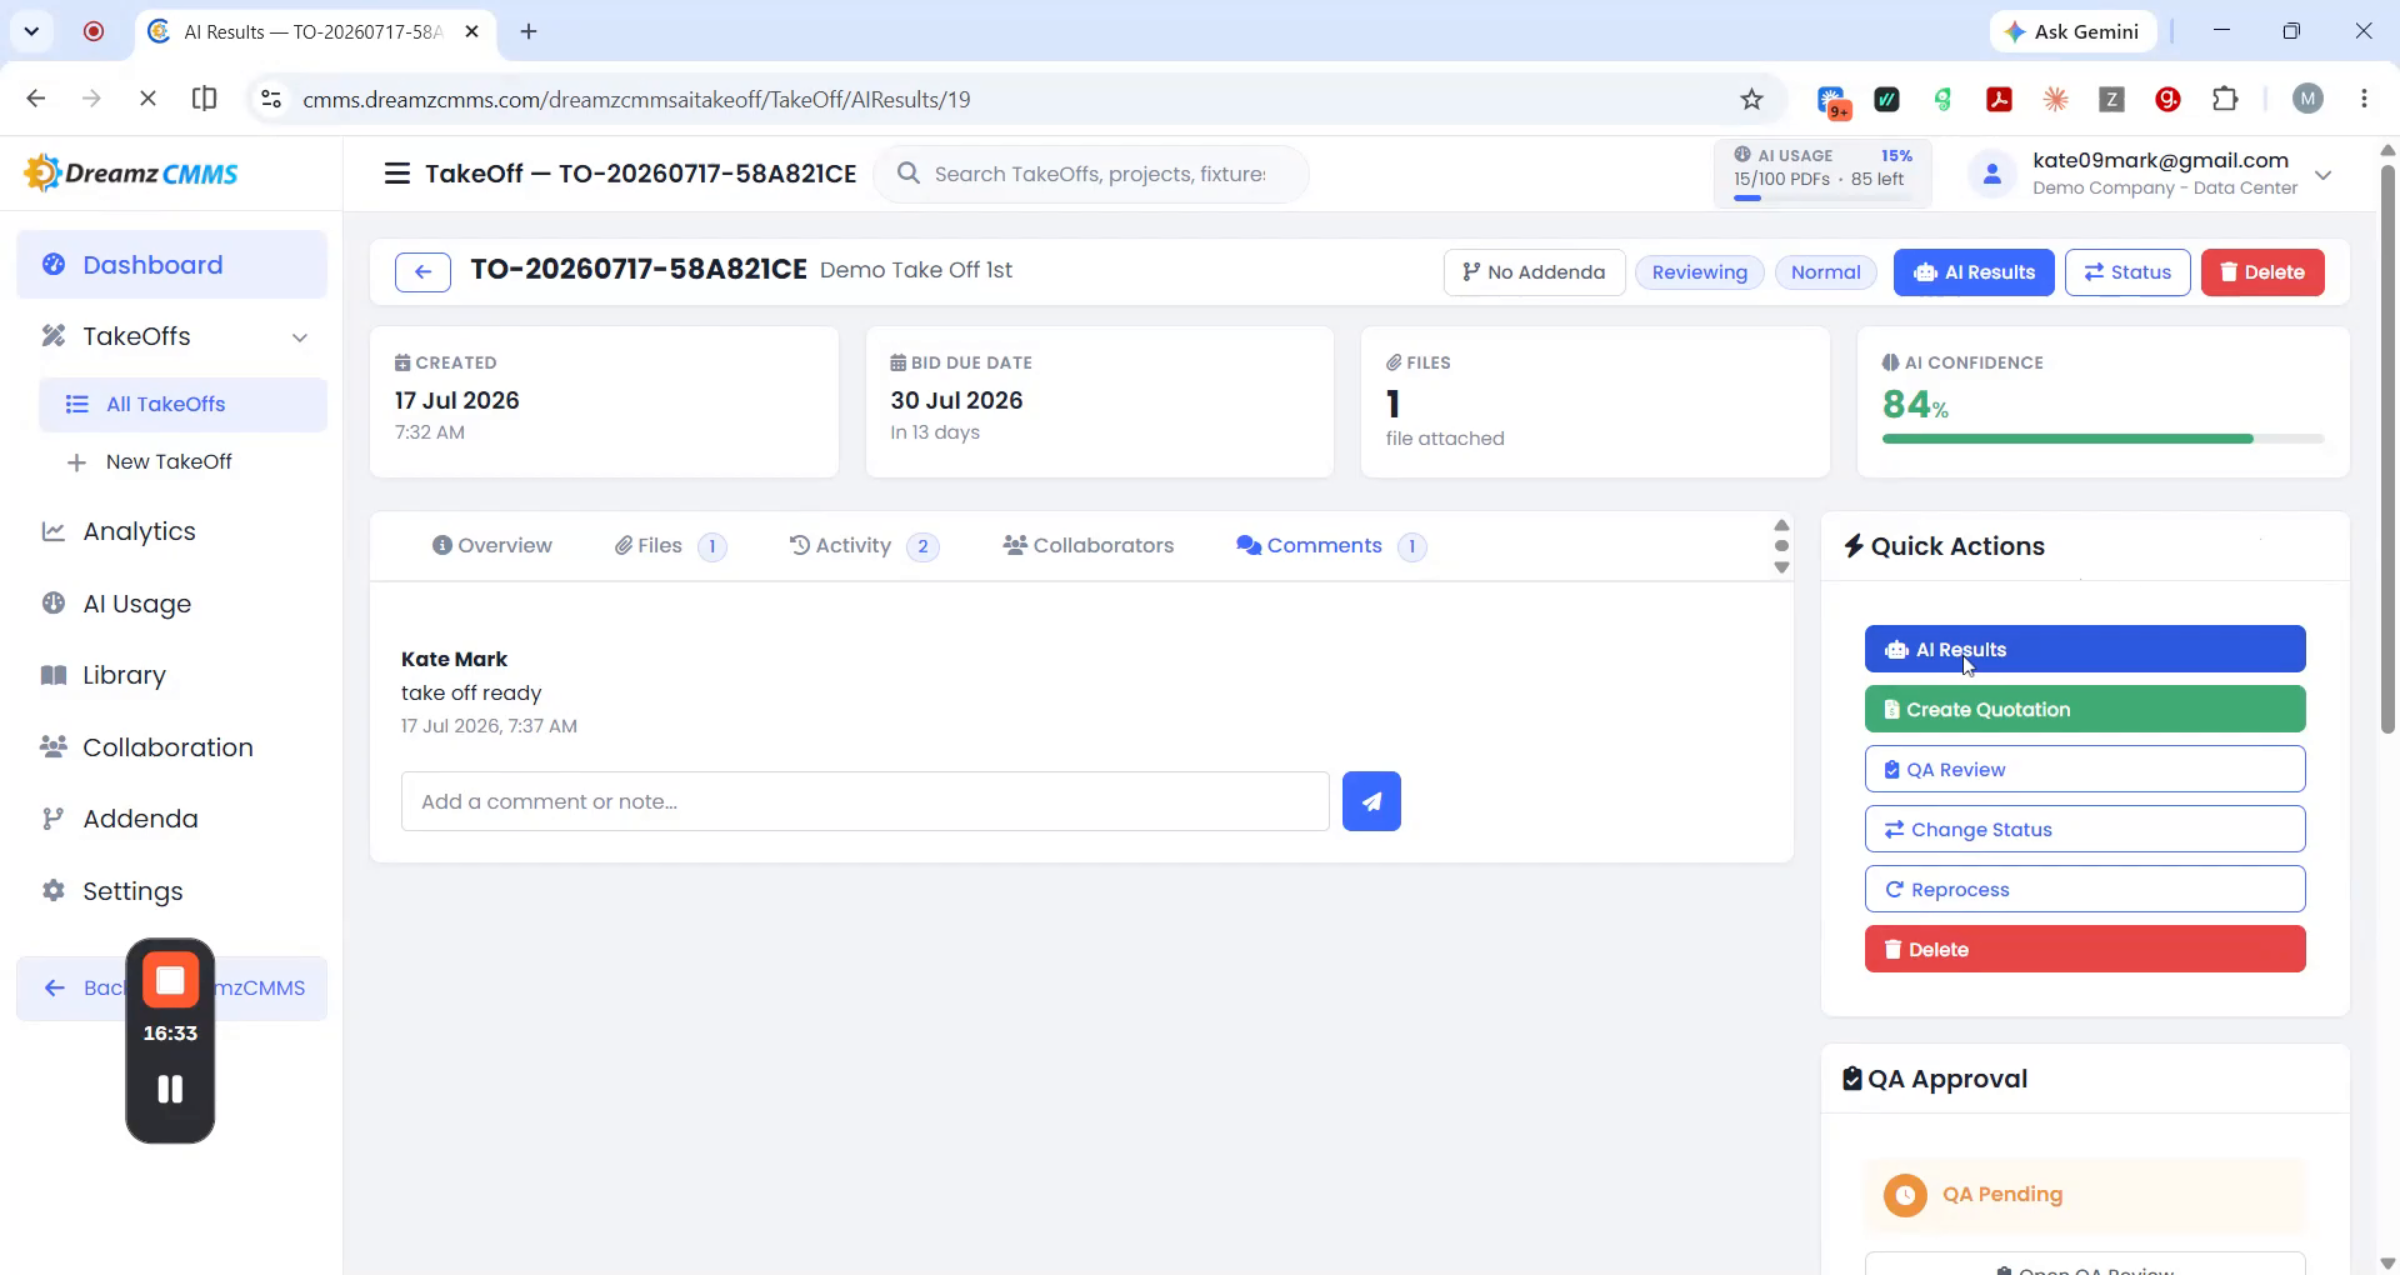
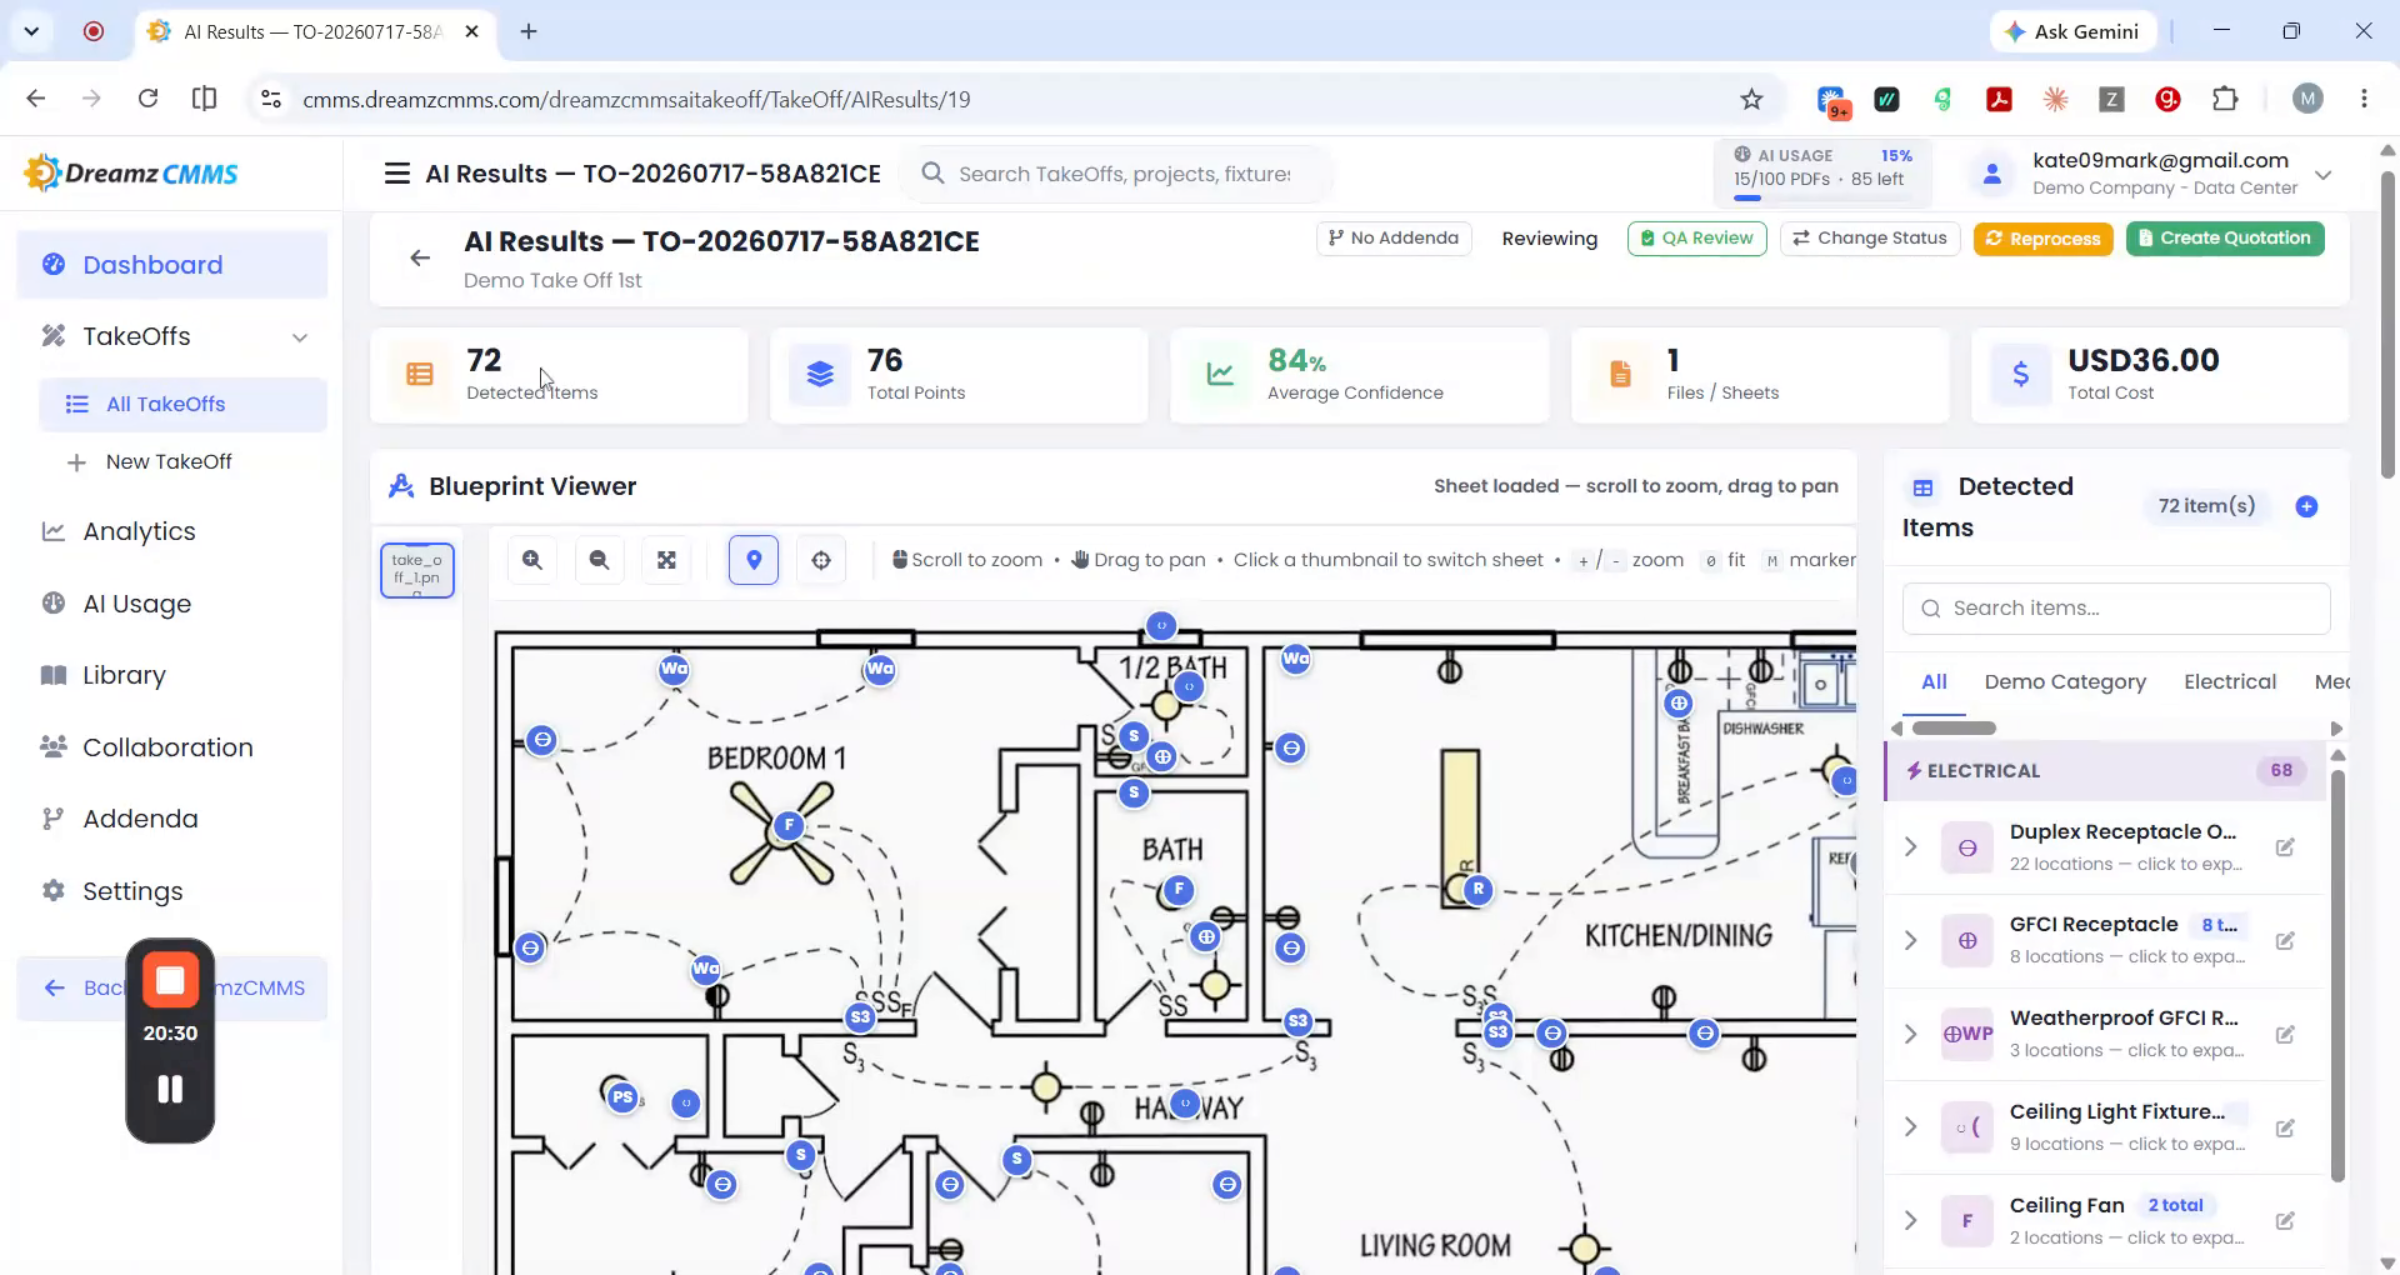
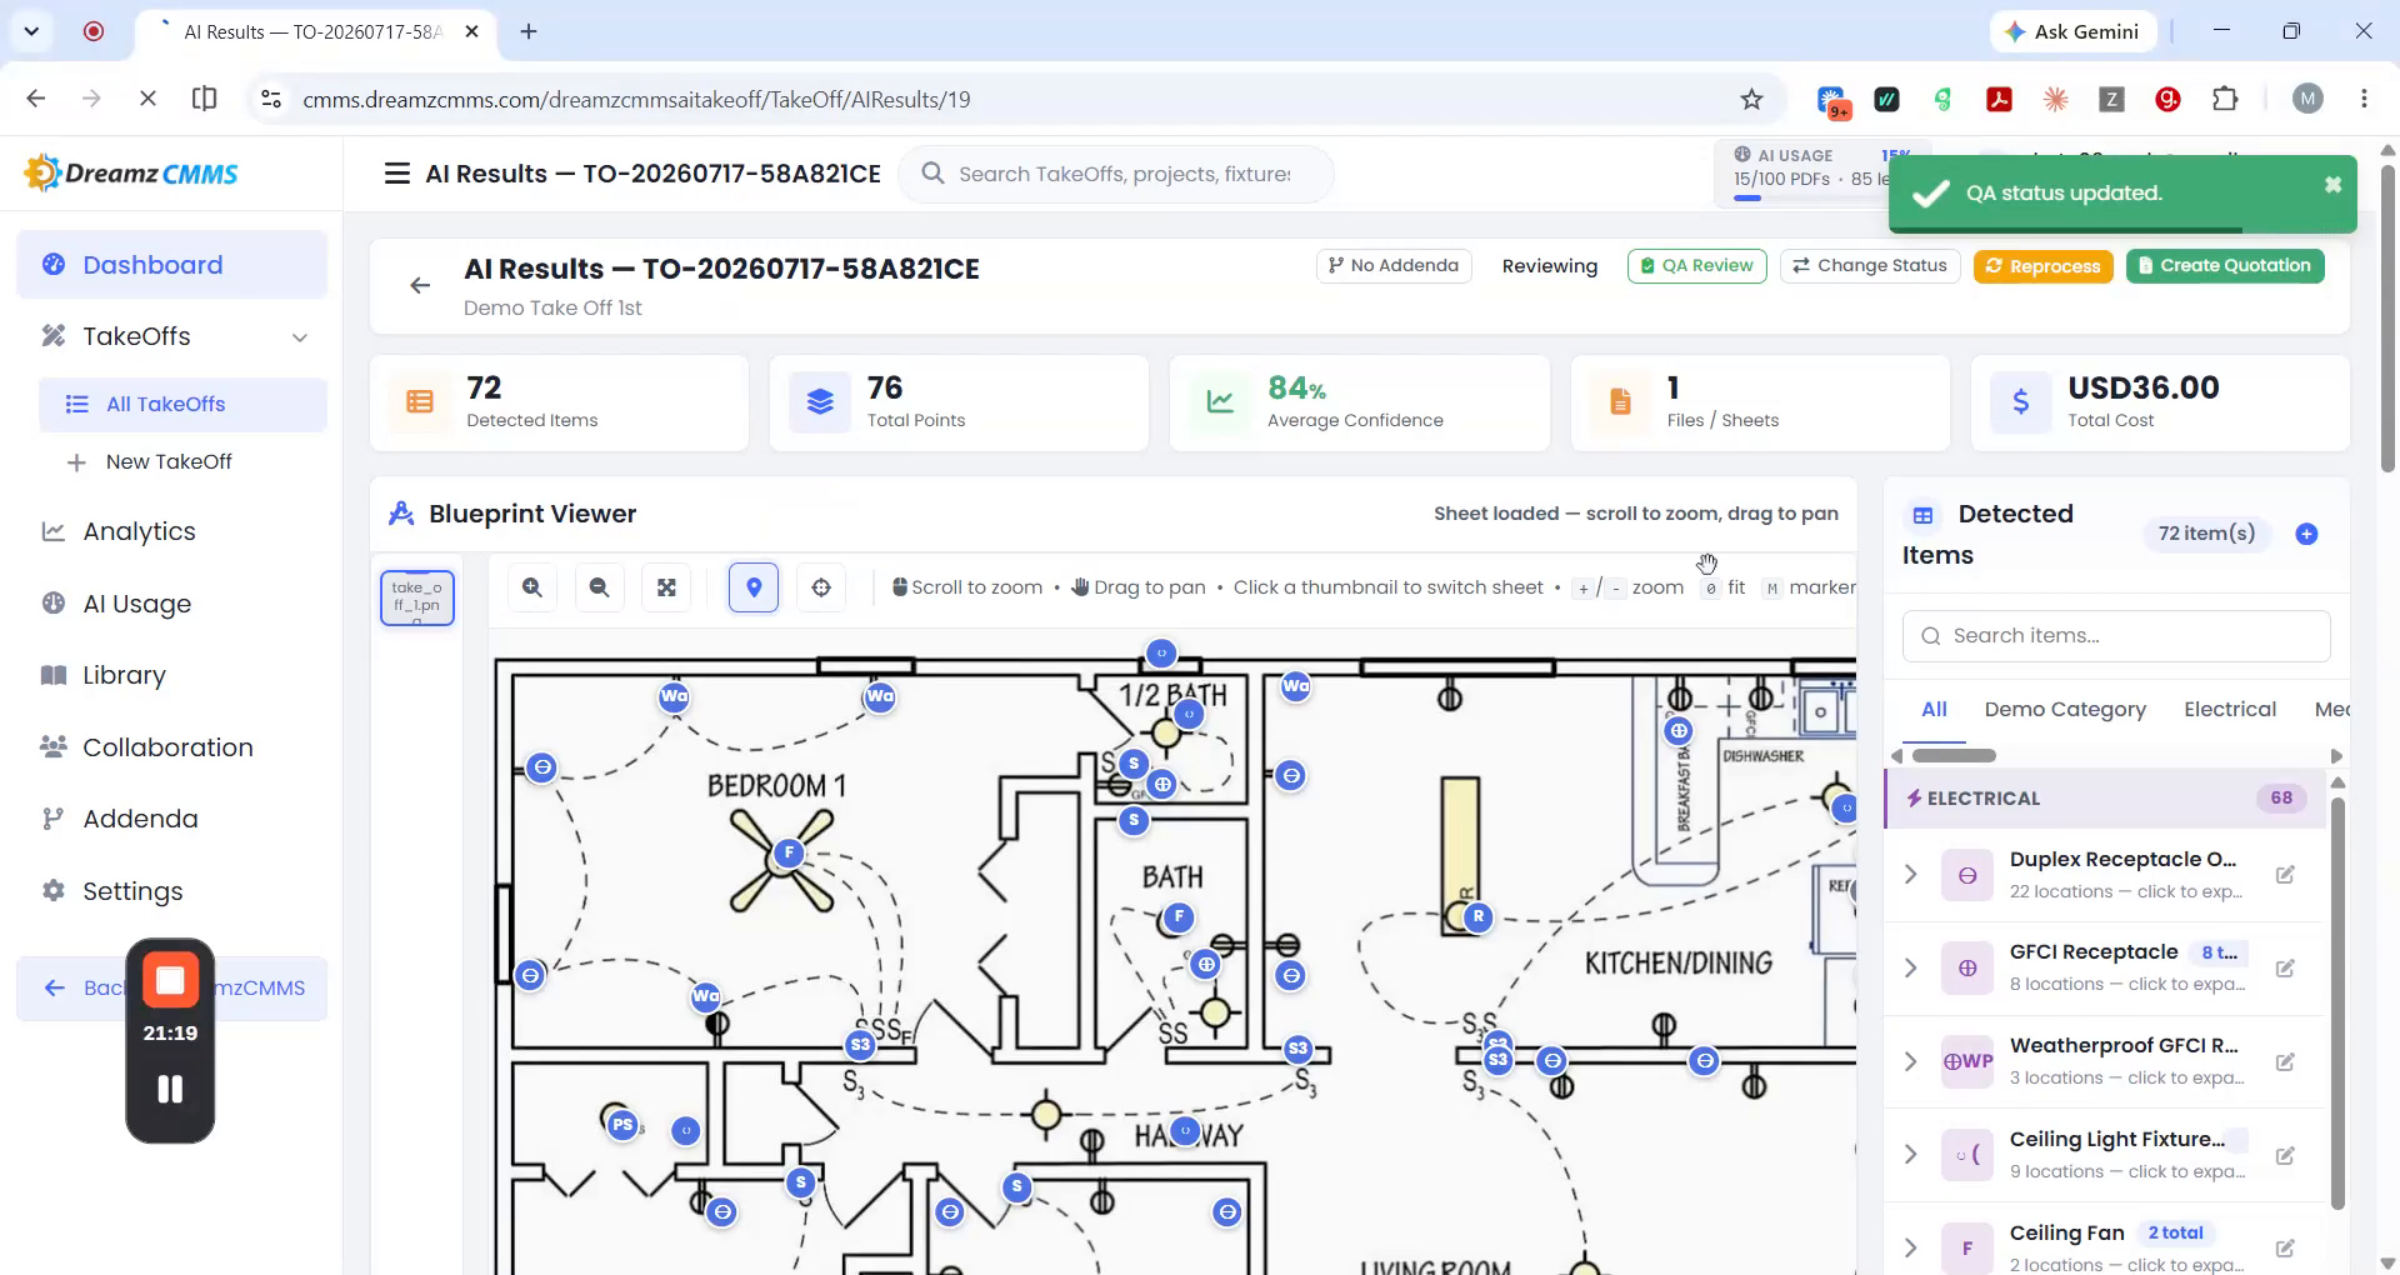
This is where the AI's work becomes visible. On the left, the blueprint or aerial image shows every detected item marked with color-coded pins. On the right, everything found is organized into category tabs — clicking any item takes you straight to where it sits on the drawing, so your team can visually confirm every count rather than trust a number in a spreadsheet. Repeated items, like multiple outlets or ceiling fans, collapse into a single summary line instead of cluttering the list.
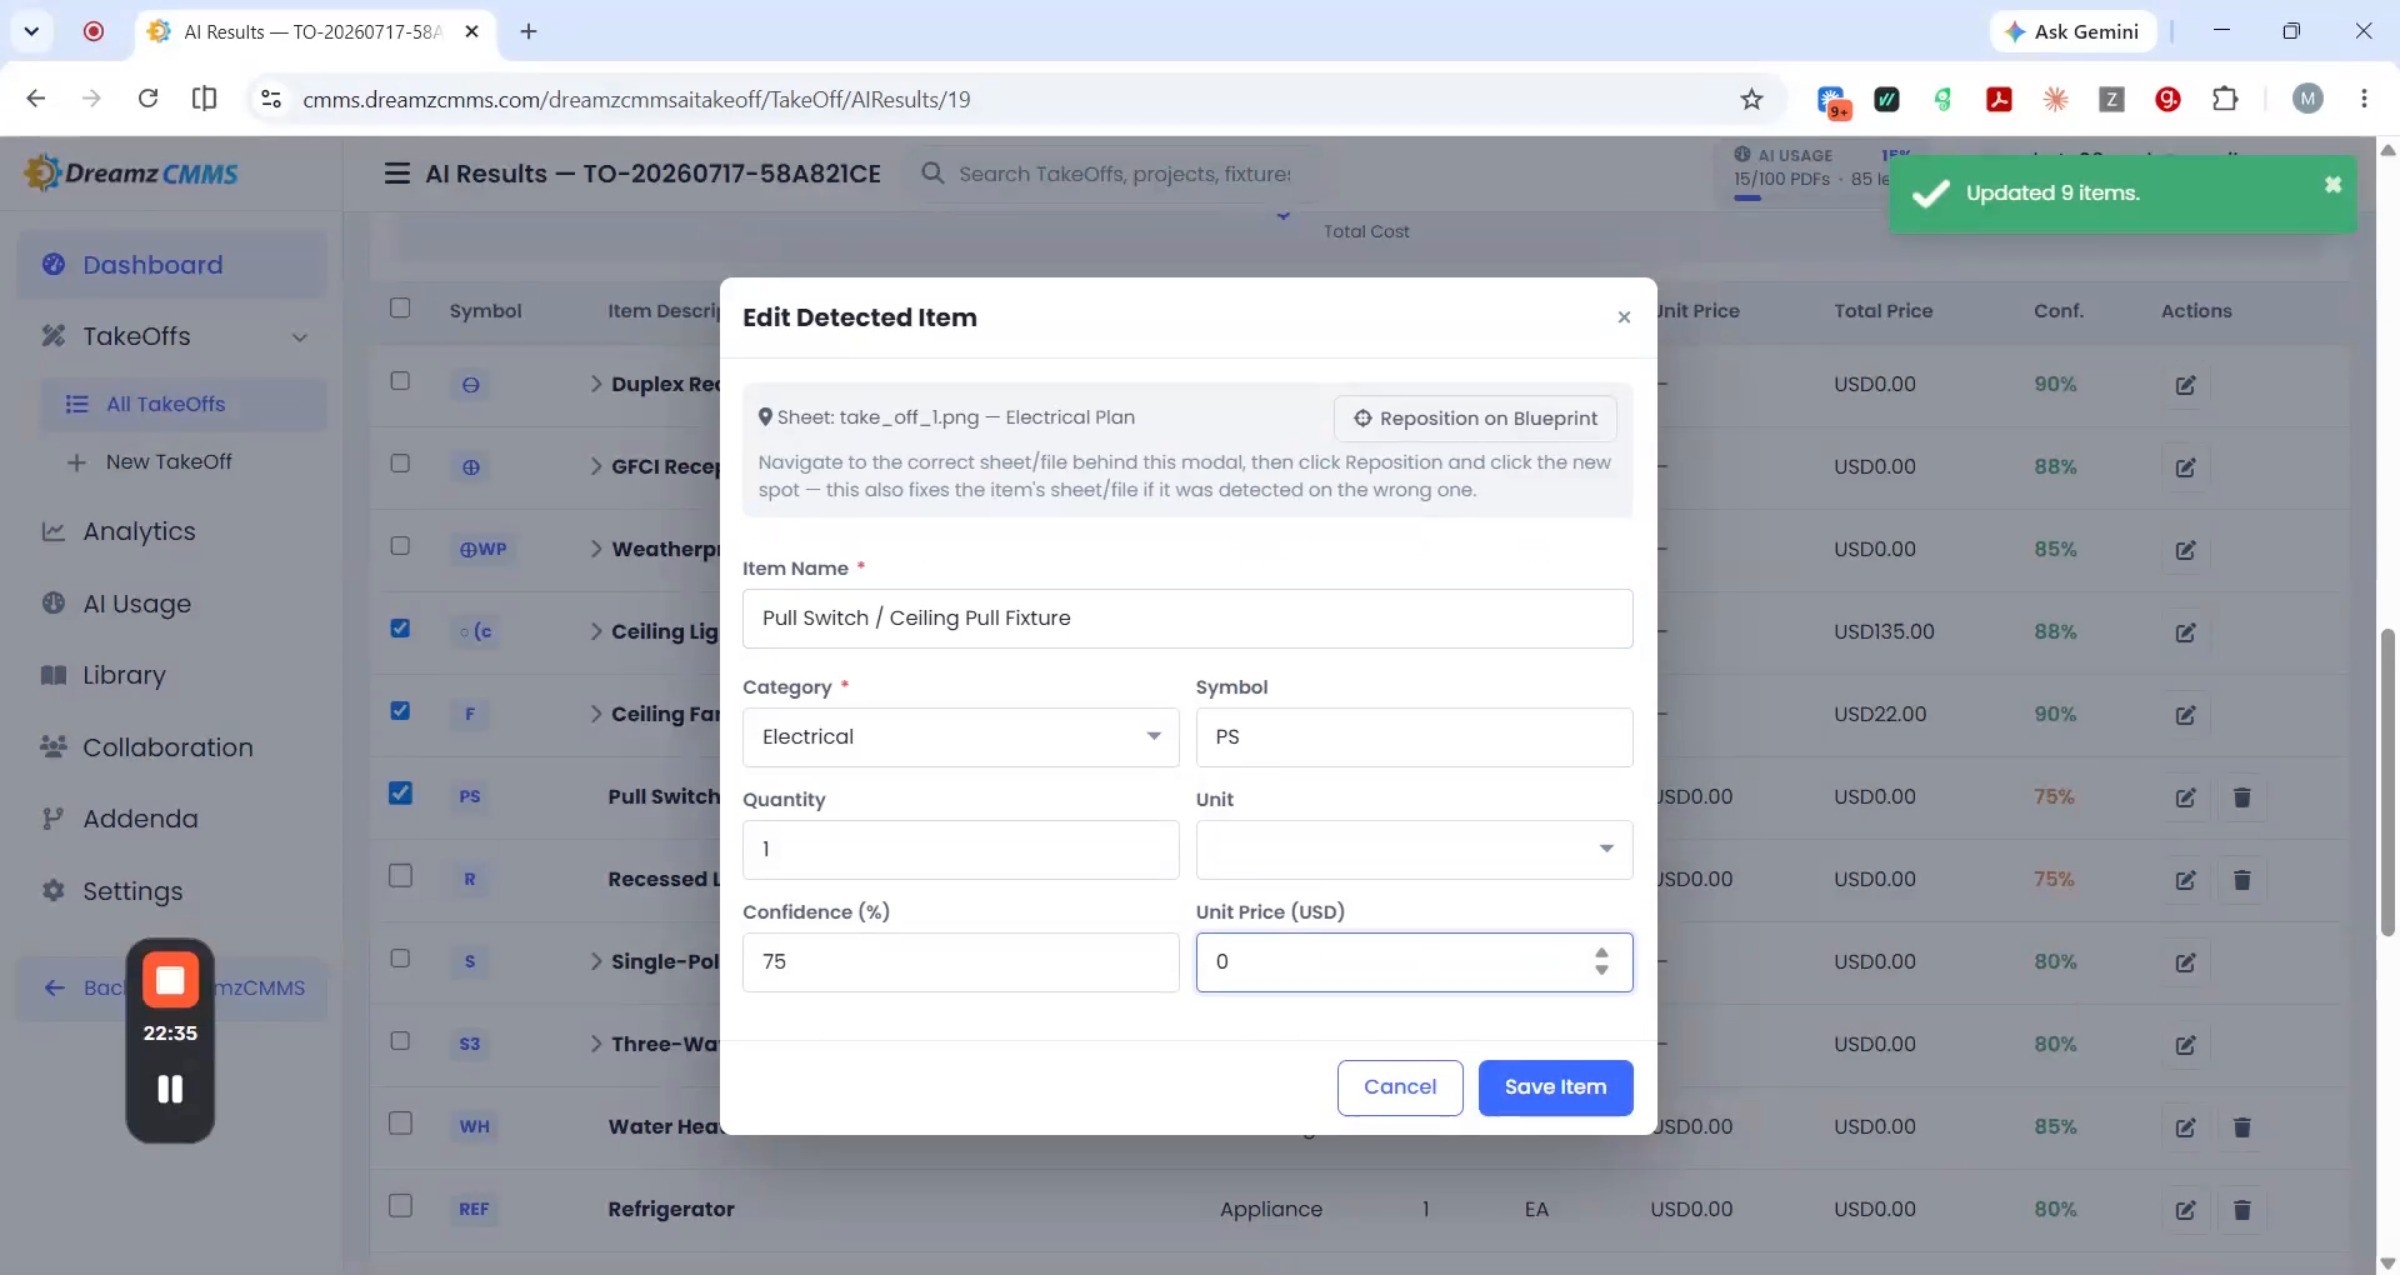
If something needs correcting, edit every instance of a grouped item at once, or edit an individual instance if only one needs a different price. You can delete items, set or adjust pricing, and add a point that was missed by clicking the plus icon and placing it directly on the drawing or image — complete with quantity, unit, and price. A summary panel shows total points detected, average confidence, how many files or sheets are involved, and the total cost of detected items.
QA Review, Status, and Creating a Quotation
From the AI result screen, you can add a new version, run a QA review, and update the review status. Once satisfied, you can mark the takeoff as complete, request a reprocess of the image or PDF, or click Create Quotation to move the detected items straight into a quote.
When creating a quotation, select every item or just the ones you want included, adding a price for any item that doesn't already have one. The customer appears automatically based on the takeoff, along with your selected items — review the details and click Save. The new quotation then appears in your quotation list, and a quotation preview is also available directly from the AI Takeoff list for that project.
Analytics and AI Usage
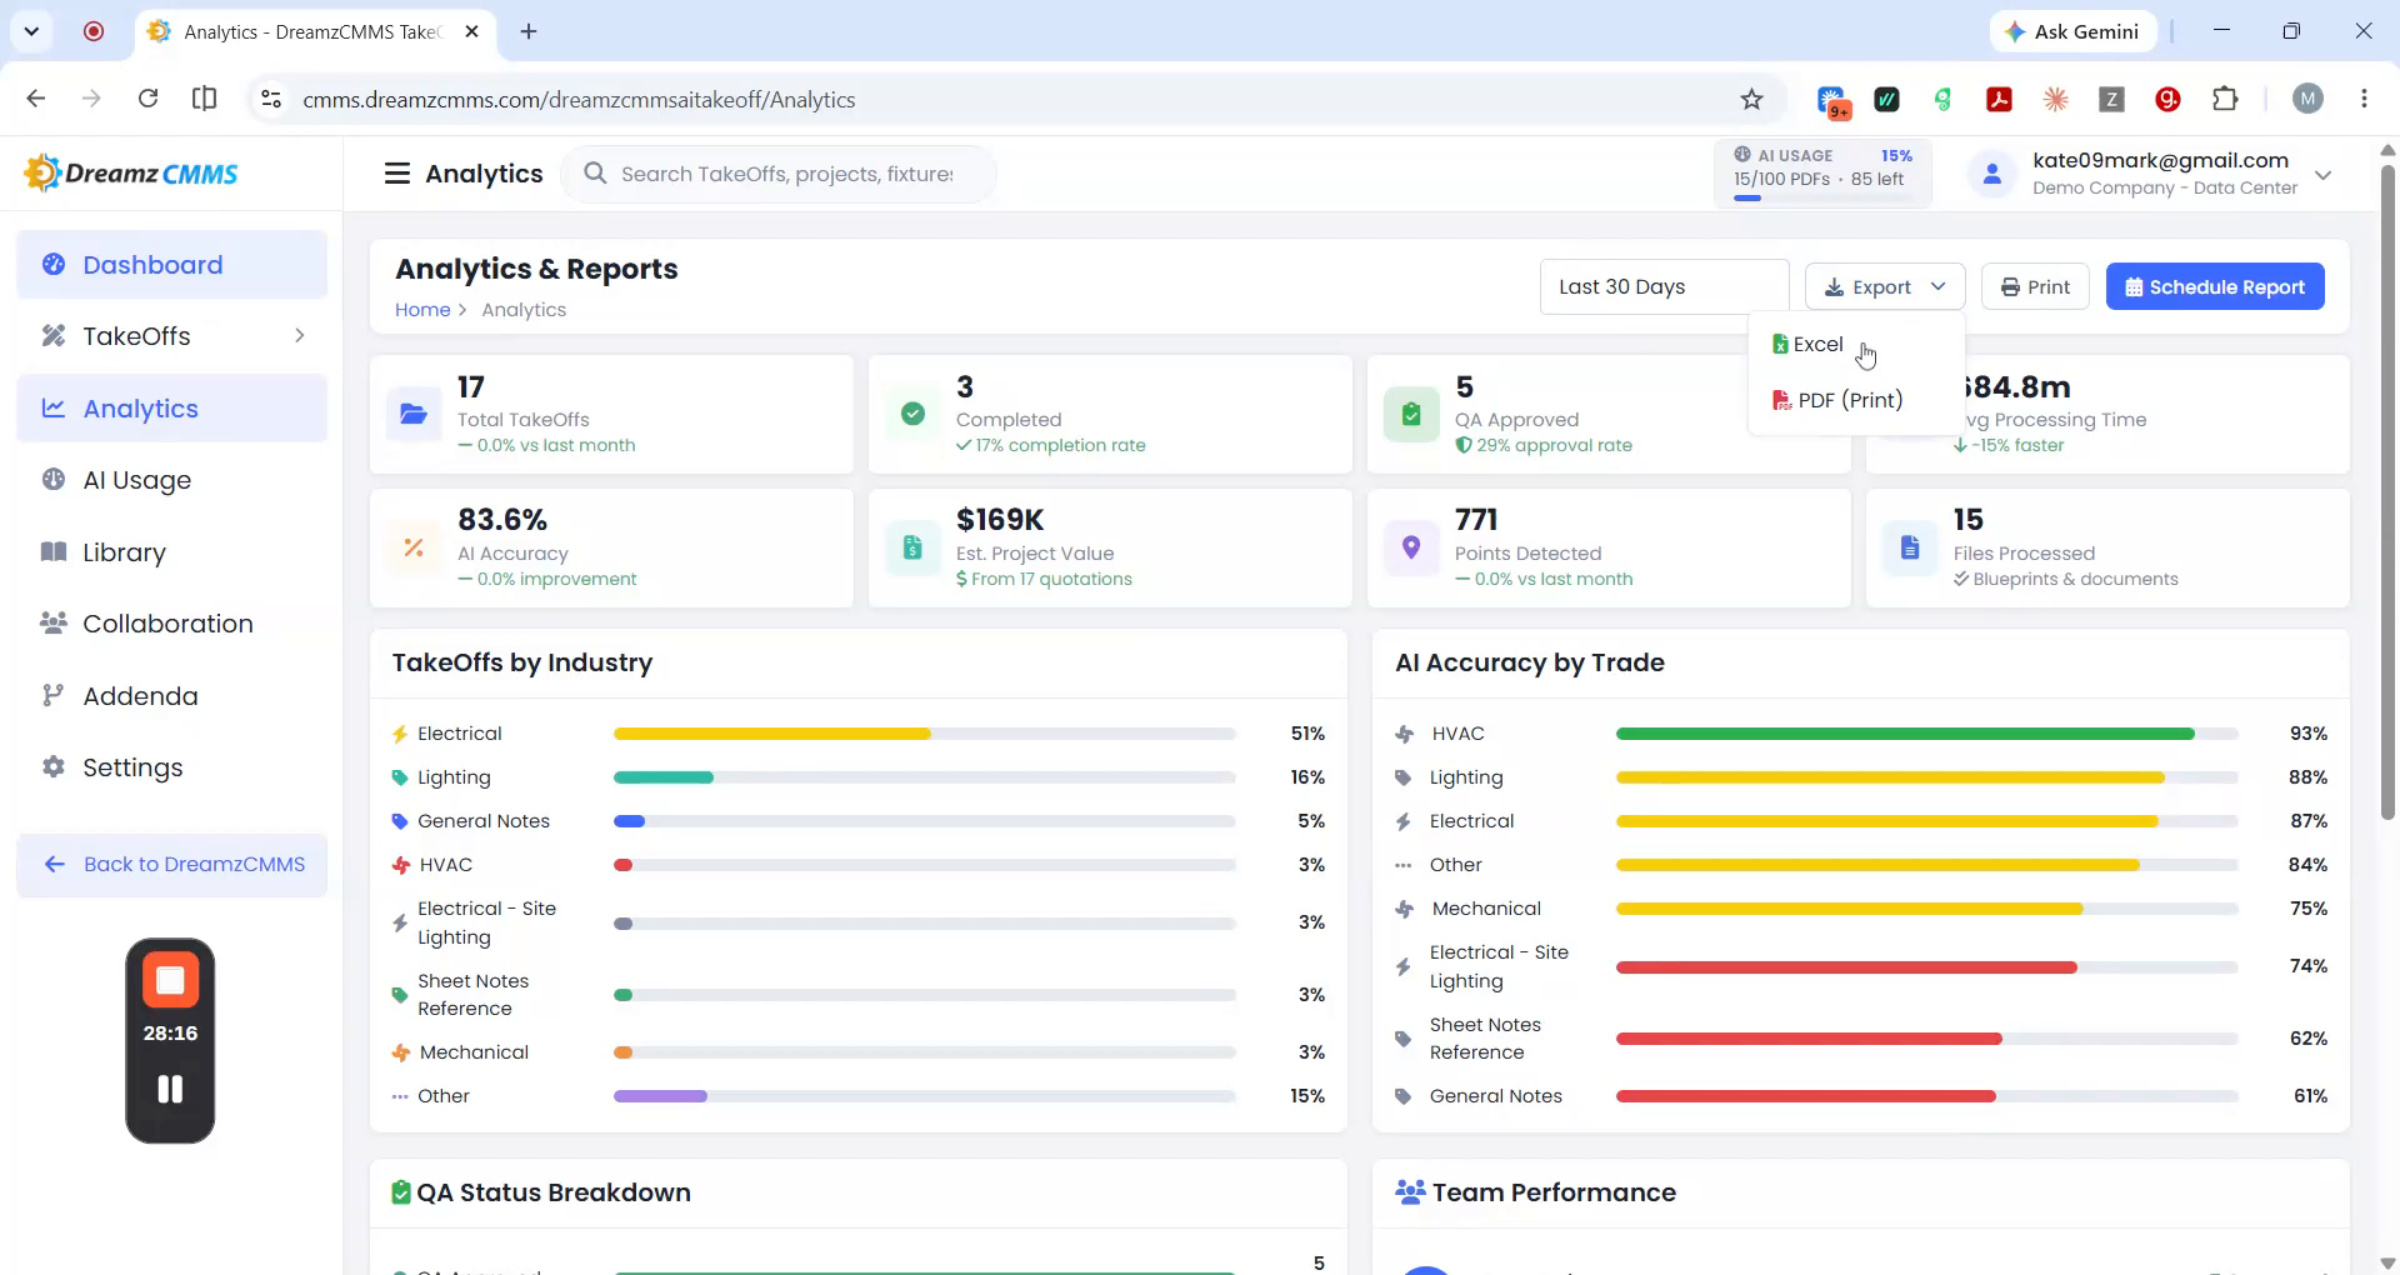
The Analytics screen turns every takeoff you've ever run into a performance picture for the whole business. A summary card at the top shows total takeoffs, completed takeoffs, QA approved, average processing time, AI accuracy, estimated project value, points detected, and files processed, with breakdowns by industry, AI accuracy by trade, team performance, and monthly takeoff volume. You can filter by 7 days, 30 days, this month, this quarter, or this year, export to Excel or PDF, and set up scheduled reports — choosing report type, frequency, recipients, and format — so the numbers get delivered automatically.
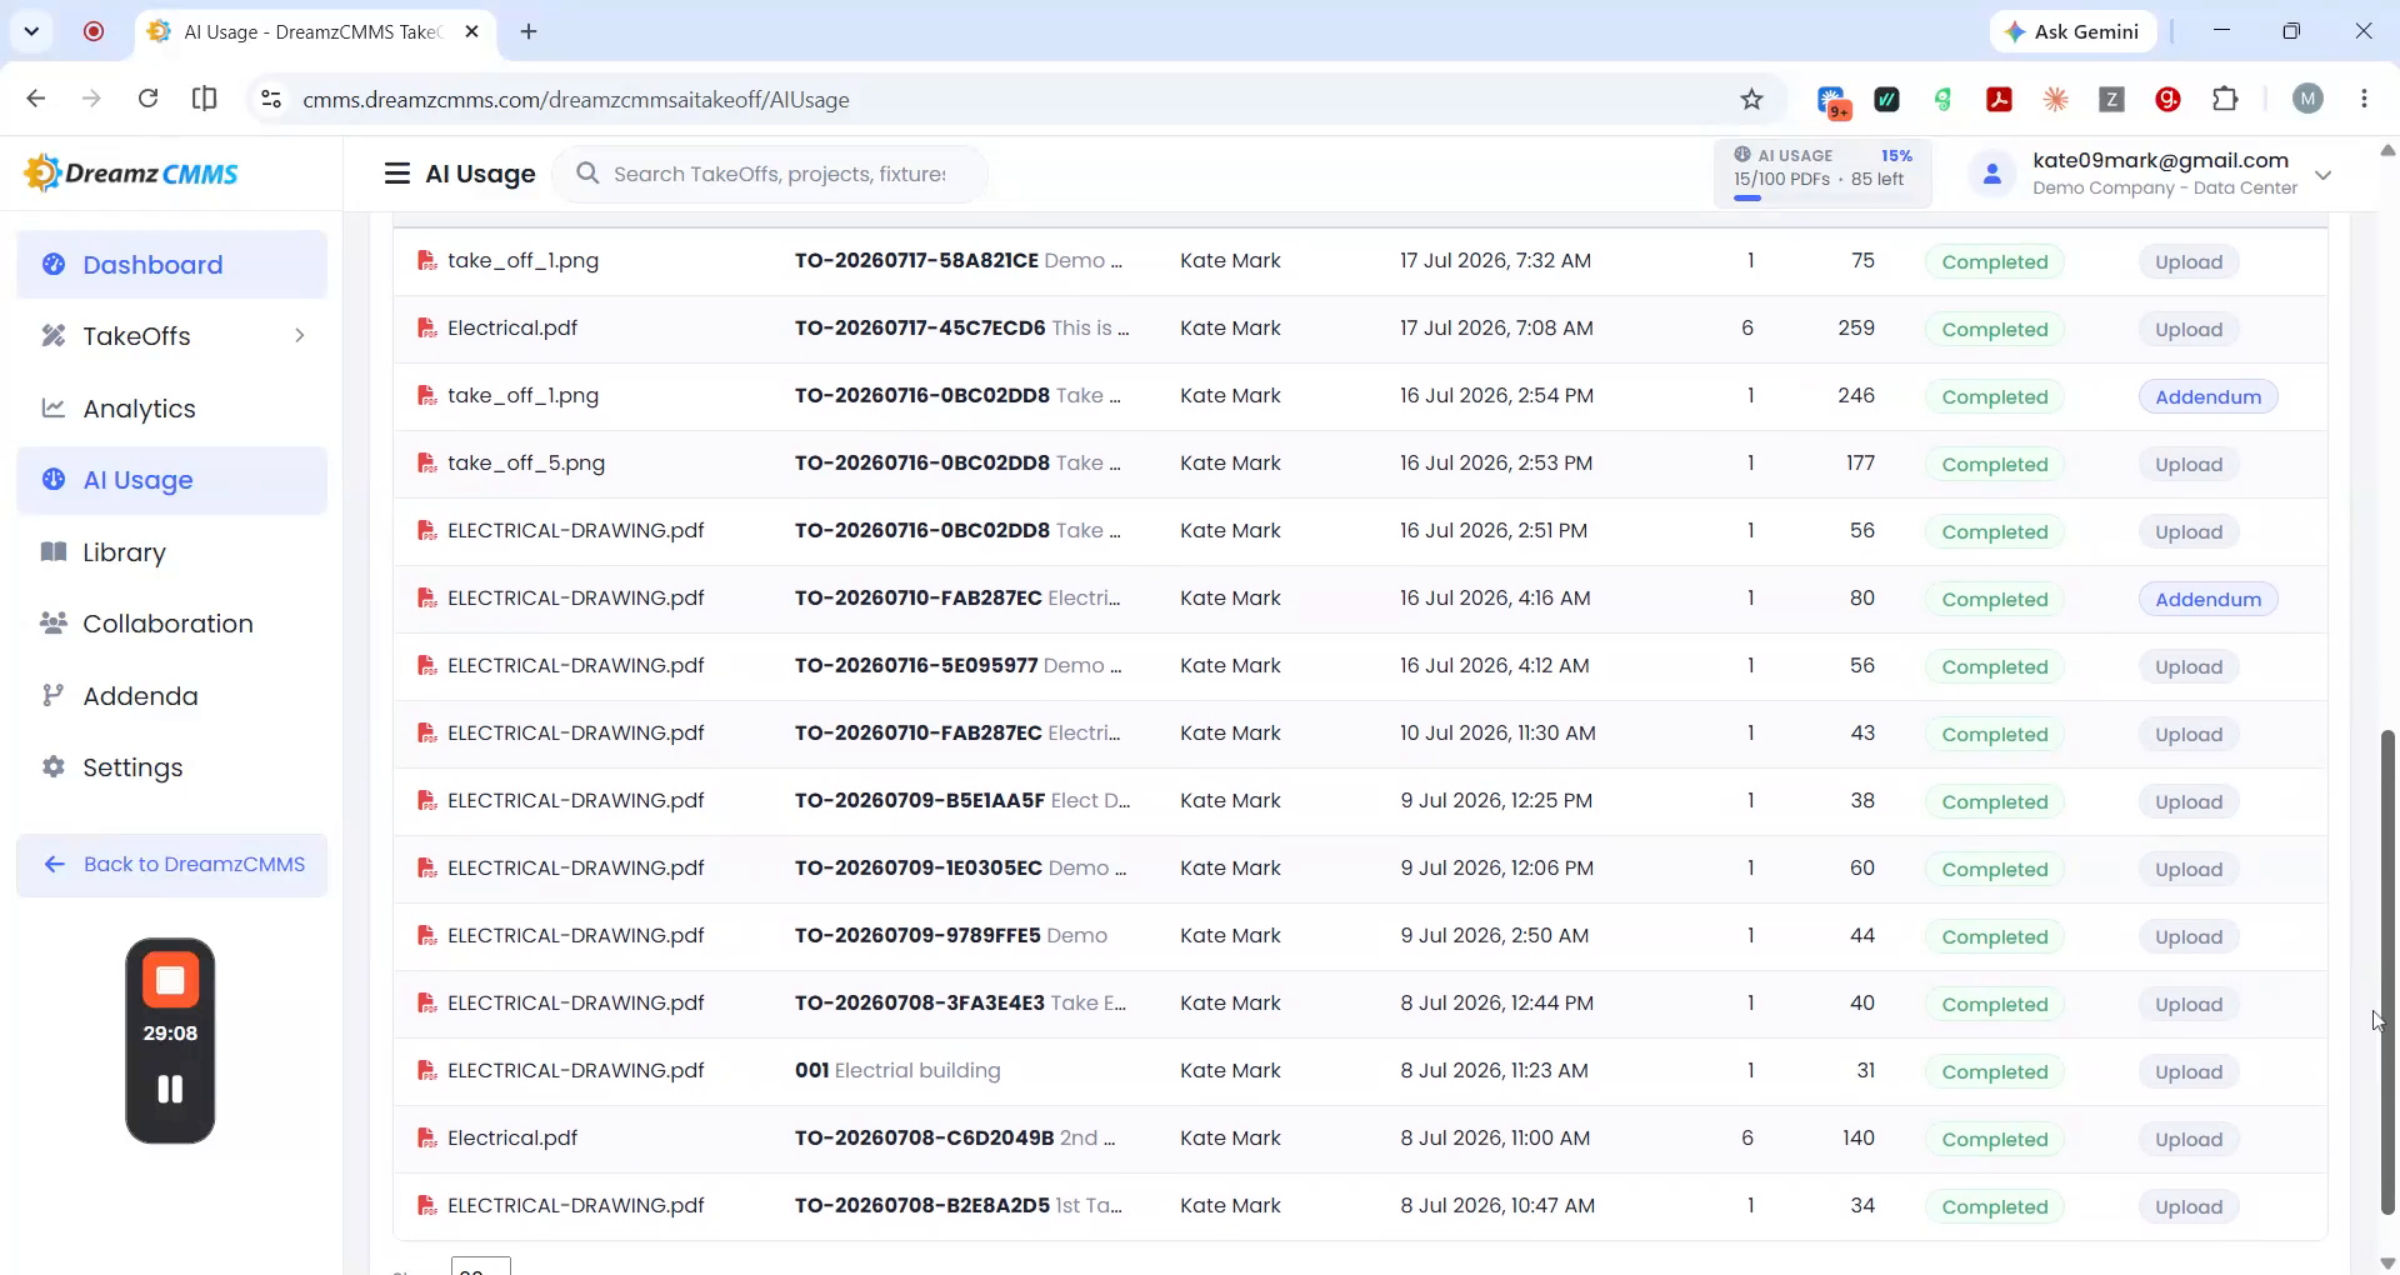
An AI Usage screen gives administrators full visibility into processing capacity: PDFs used this month, PDFs remaining, pages processed, and pages remaining, with a visual breakdown of usage versus remaining capacity and a monthly processing volume chart. A processing history table logs every file processed — which takeoff it belongs to, who processed it, how many pages and items were detected, and whether it came from an upload, reprocess, or addenda — so you always know exactly where your account stands against your plan limit.
Template Library
The template library is where repeatable work becomes reusable. The Pre-Built tab ships with ready-made assemblies covering the most common trades — electrical, HVAC, plumbing, fire protection, structural, and basic measurement. Click any template to see what's included in each assembly, its unit system, and whether it supports formula-based calculations, then click Use Template to carry it straight into a new takeoff already configured for that trade. Switch to the Custom Library to find your own templates and assemblies organized into folders, or build a new one from scratch with a guided wizard covering basic information, assembly configuration, formulas, and review — set up once, reused across every estimate on the team.
Team Collaboration
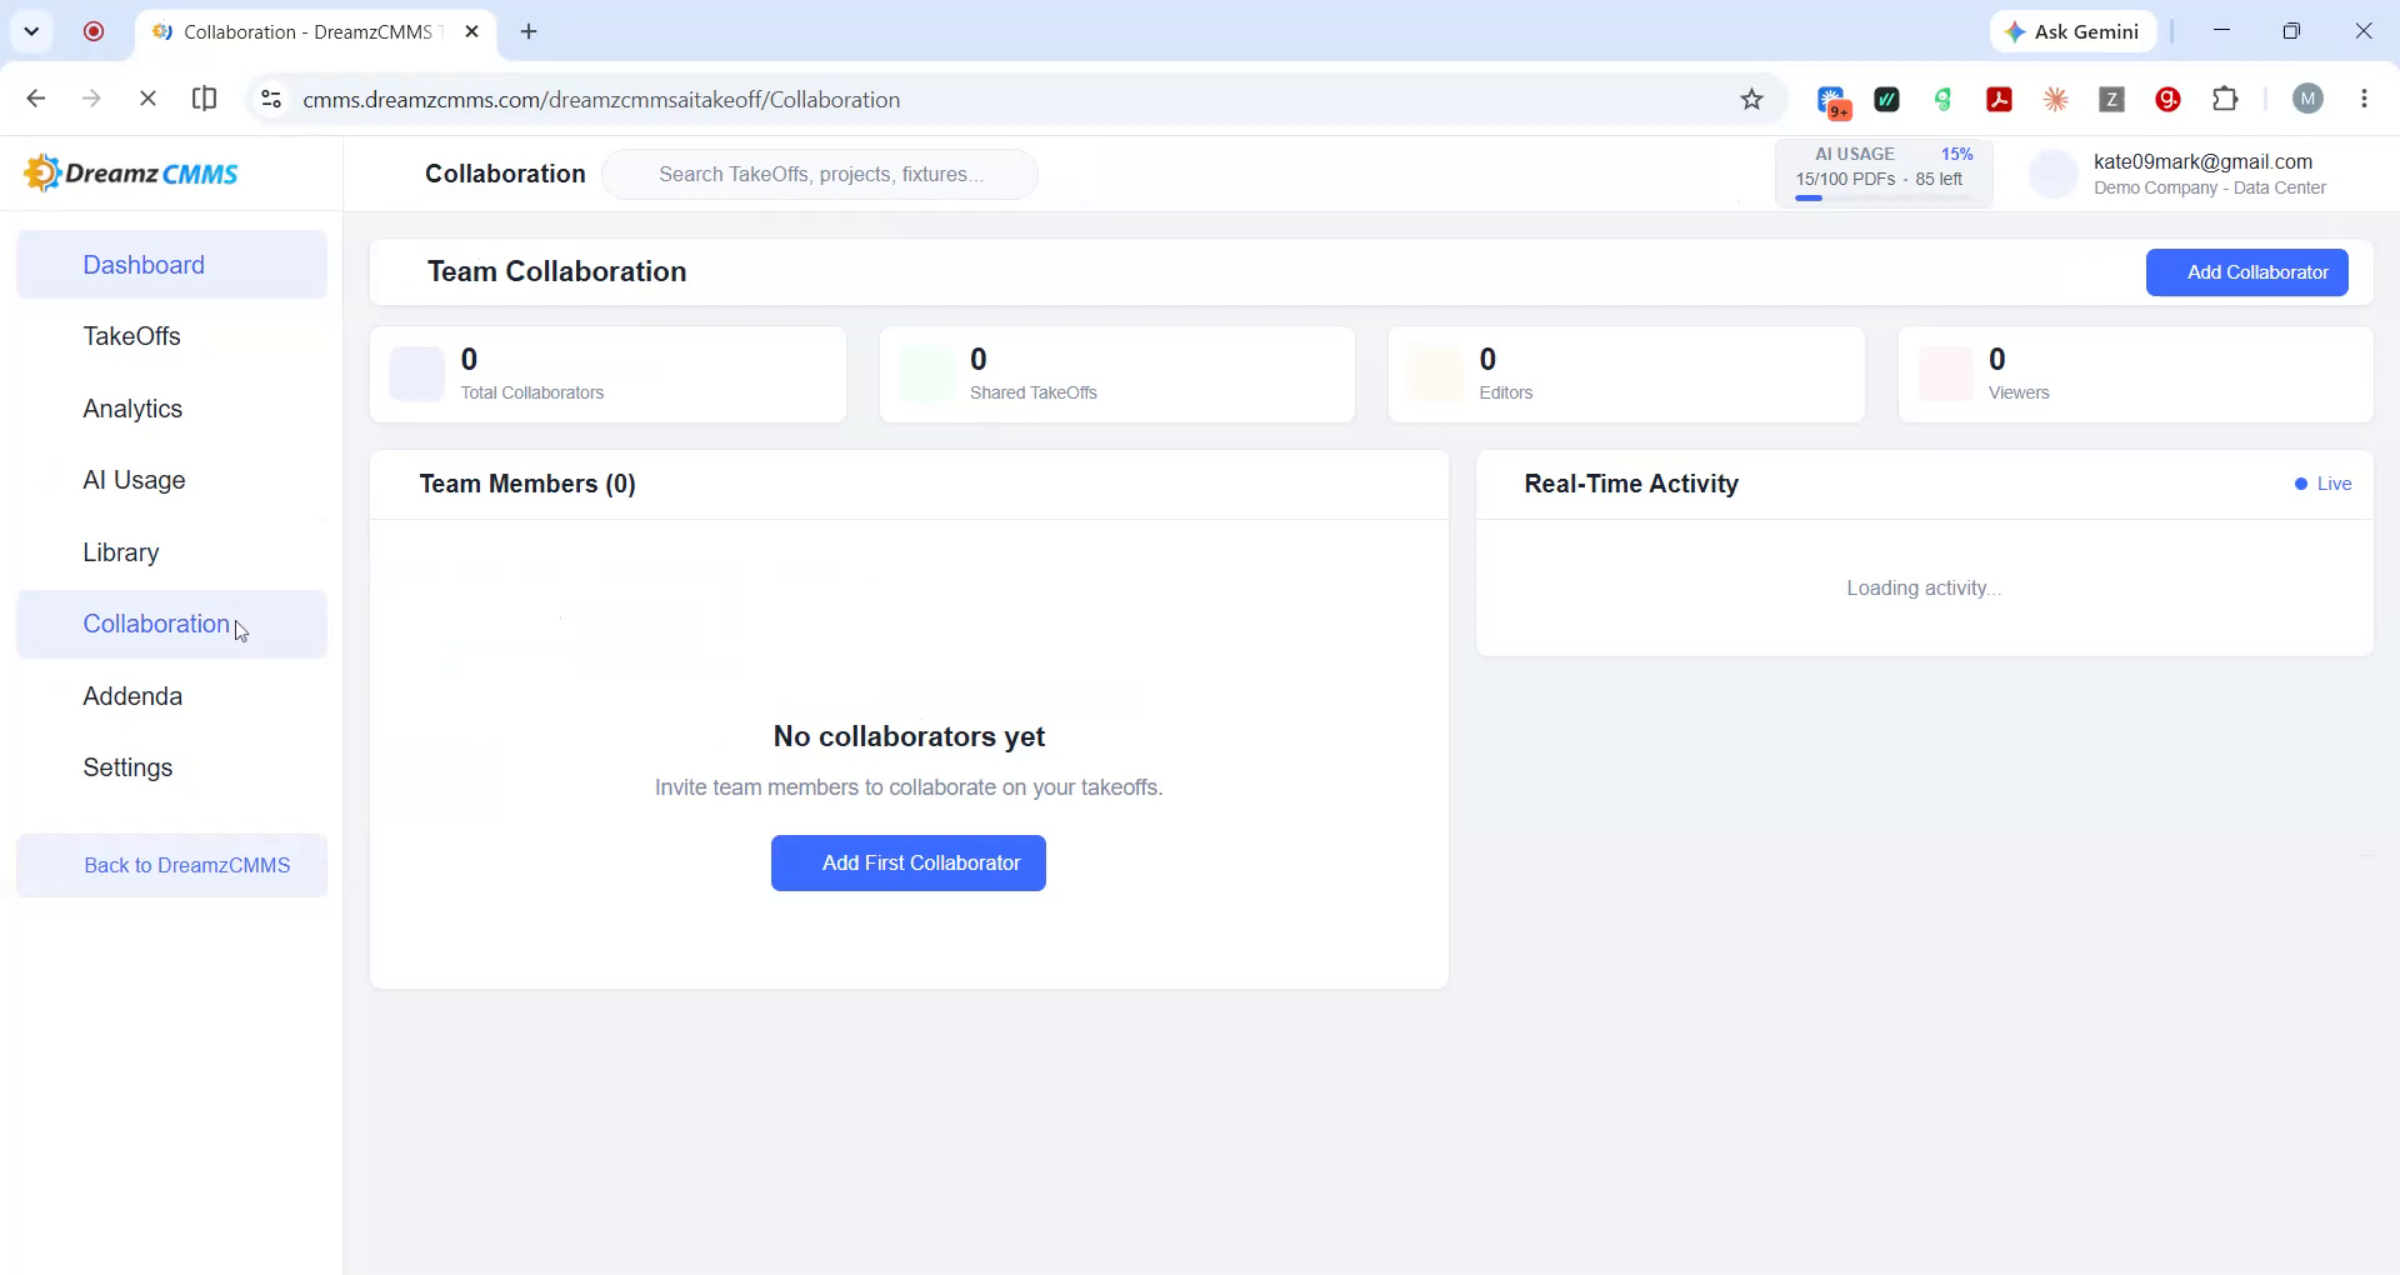
The Collaboration screen gives you visibility into who's working on what across the entire team — total collaborators, shared takeoffs, editors, and viewers, plus a list of team members with their assigned takeoffs and roles. A real-time activity feed with live indicators shows what's happening across shared projects. To bring someone into a project, click Add Collaborator, search for the takeoff, select the user, set their access level, and confirm.
Tracking Changes with Addenda
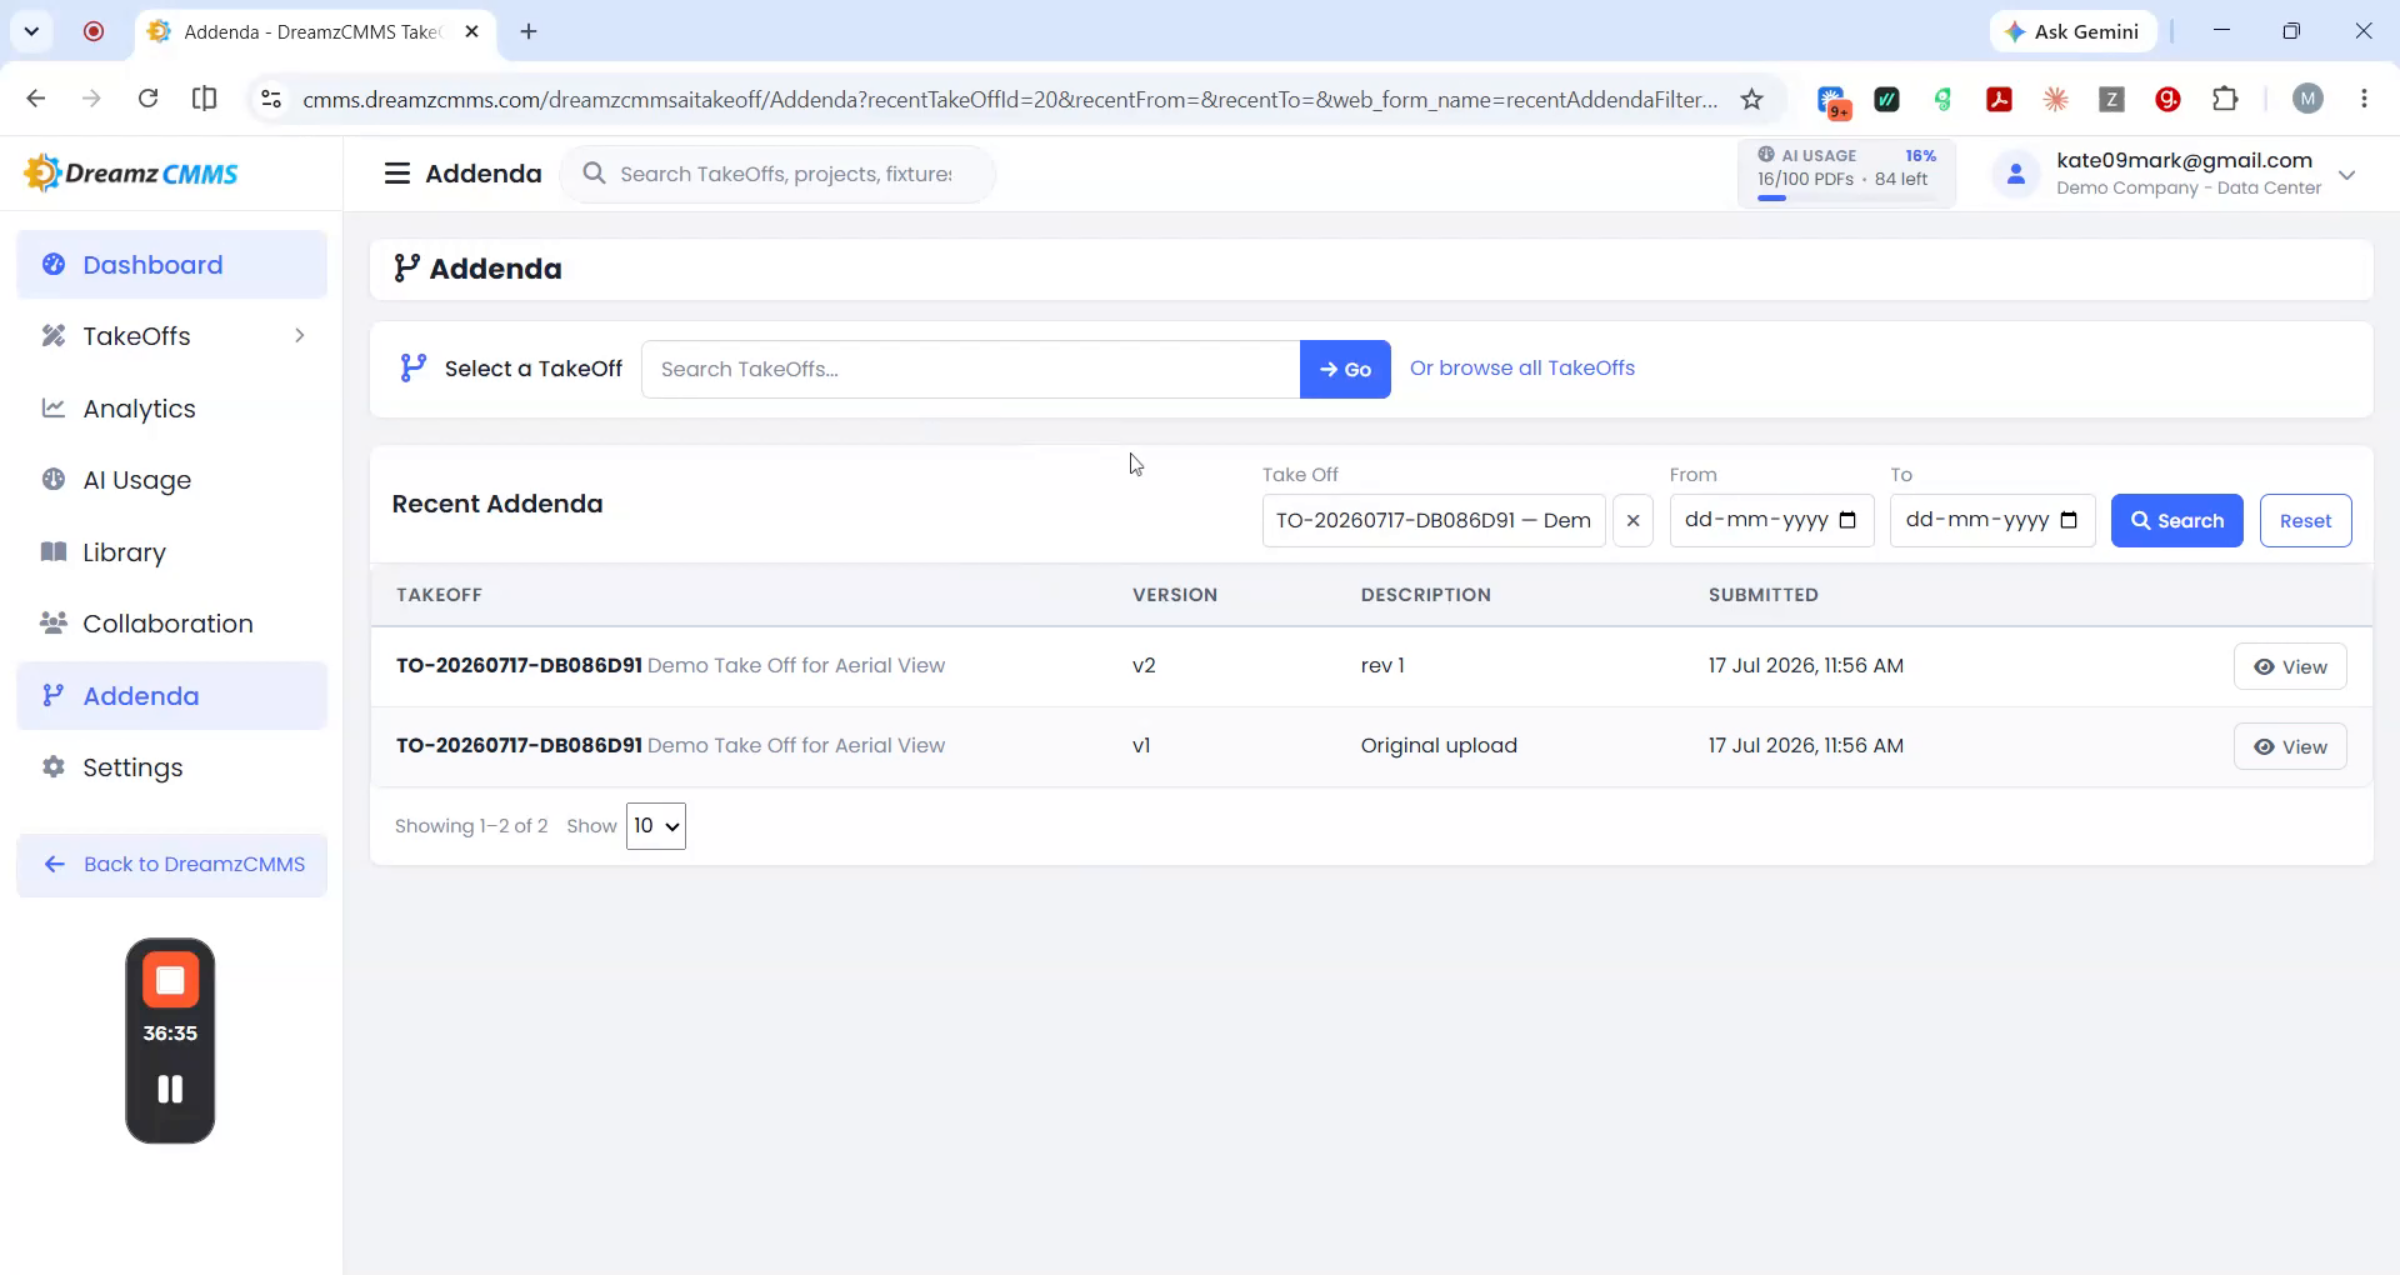
When scope gets revised or a drawing gets updated, Addenda is how the application tracks every change cleanly without losing the original work. In the Addenda screen, you can search by takeoff or date range and see version history. Add a new version, provide a revision note, and save it — once processing completes, you'll see how many items were added, modified, or removed, and the net change. If needed, restore a previous version with a single click. It's a complete audit trail: when a client asks what changed and why, the answer is one click away, not a search through old email attachments.
Administrator Settings
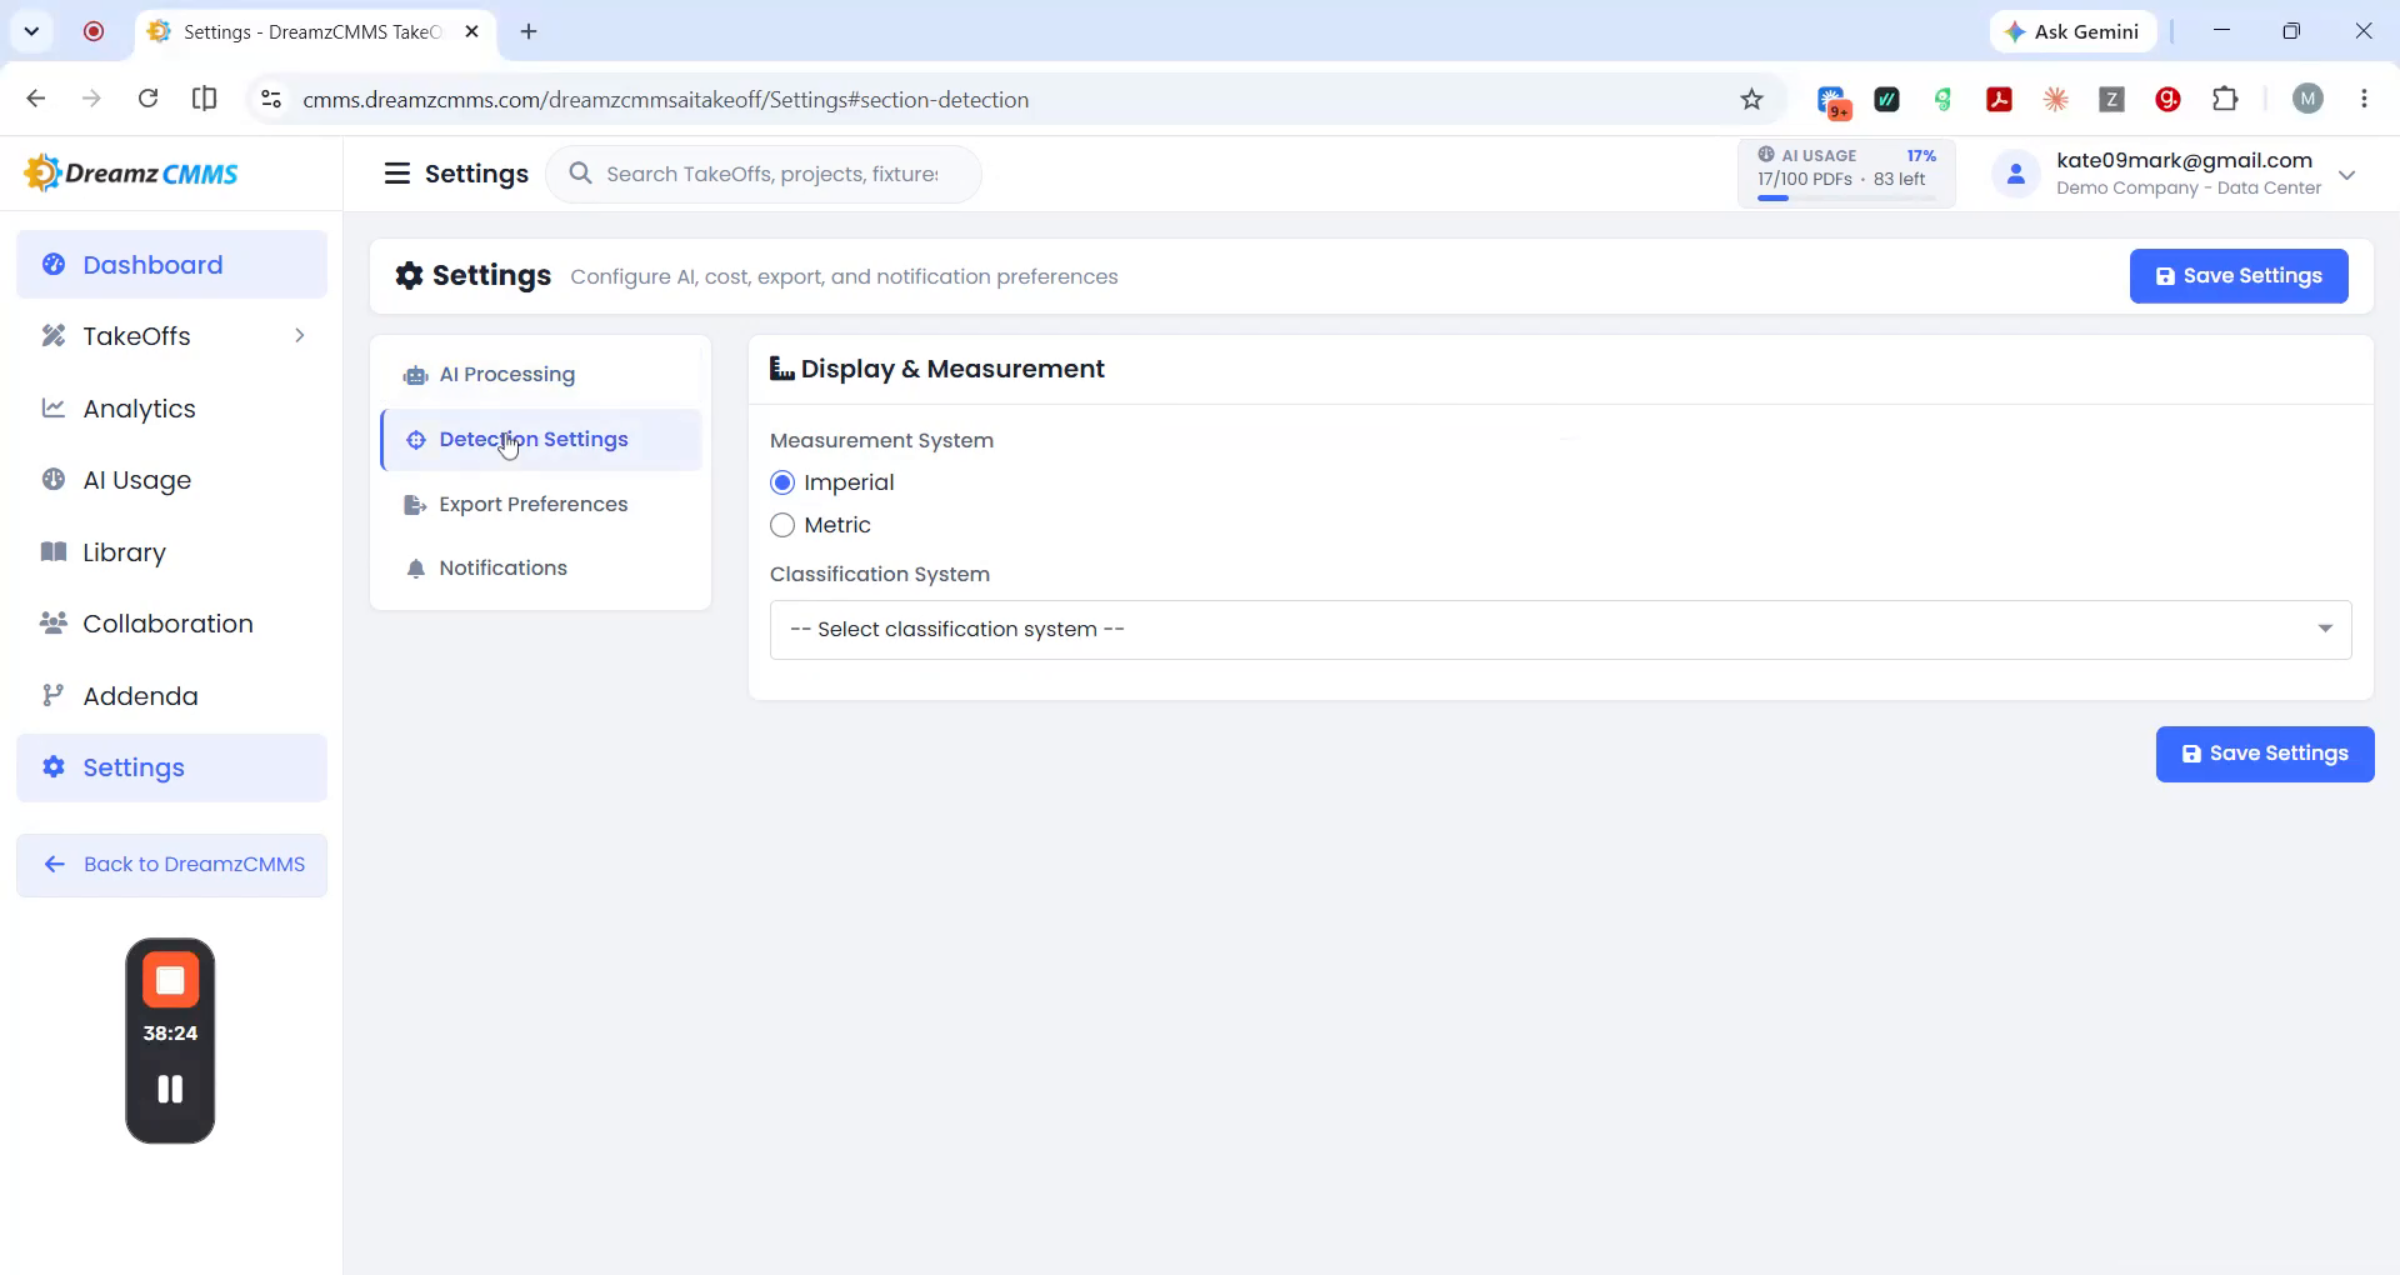
Settings is where administrators tune how the application behaves company-wide: setting the AI confidence level, enabling training mode, deciding whether uploads auto-process, and requiring QA verification before results are finalized. Admins can also manage symbols, trade categories, and free viewer access, along with classification settings, preferred measurement system, and export preferences (Excel or PDF by default). Notification settings control how and when the team gets alerted about activity — putting governance in the hands of the people who need it, with company-wide standards and defaults set once and applied consistently for every user and project.
At any point, click Back to DreamzCMMS to return to the main platform — this Takeoff application isn't a separate silo, it's one integrated part of the same system you already use to run your business. One login, one platform, no switching between disconnected tools.
After Your Takeoff — What's Next?
From a set of drawings or a satellite view of a site, to an AI-generated takeoff, to a human-verified QA approval and a quotation ready to send — that's a complete estimating workflow, delivered entirely inside DreamzCMMS. Once you're comfortable with the core flow, you can:
- Build out your custom template library so common trade setups only need to be configured once.
- Set up scheduled analytics reports so leadership gets performance numbers automatically.
- Use Addenda whenever scope changes, instead of tracking revisions manually over email.
Less time counting, more time building and winning the next project — that's the AI-based Take Off software. Ready to see it in action? Contact DreamzTech to schedule a personalized demonstration.
Tips for Better Takeoffs
- Use a Pre-Built template that matches your trade when possible — it's usually faster than building assemblies from scratch.
- Always visually confirm AI-detected counts against the drawing before approving, especially for grouped items with many instances.
- Use Addenda for any scope change instead of creating a brand-new takeoff — it preserves your original work and full history.
- Check the AI Usage screen periodically if you're processing high volumes, so you don't run into a plan limit mid-project.
Frequently Asked Questions
What file types can I upload for a plan-based takeoff?
You can upload PDF, PNG, JPG, or TIFF files.
Can I create a takeoff without an uploaded drawing?
Yes. Aerial takeoffs work from a satellite view of a site location instead of an uploaded file — you draw the outline directly on the map.
What happens if the AI misses an item or gets one wrong?
You can add a missed point directly on the drawing or image using the plus icon, or edit, correct, or delete any detected item from the AI result screen.
How do I turn a takeoff into a quotation?
From the takeoff detail page or AI result screen, click Create Quotation, select the items you want included (with pricing), and save — the quotation appears in your quotation list and is also viewable from the takeoff list.