Schedule Maintenance
DreamzFSM allows you to create Scheduled Maintenance plans to automate recurring maintenance activities across your assets. You can configure a scheduler to follow a default frequency (such as yearly, monthly, or weekly) or define a fully custom schedule with flexible interval and trigger settings. Schedulers can either generate individual jobs directly or create a maintenance plan that can be reviewed and converted into work orders when needed.
- Create scheduled maintenance using default or custom frequency settings
- Generate maintenance plans or jobs automatically based on the schedule
- Assign locations, assets, checklists, and personnel to each scheduler
- Configure overdue settings, end conditions, and PM notifications
- View plans in list, calendar, or bird view and generate work orders directly
Overview
Scheduled Maintenance is managed from the Scheduled Maintenance section in the left-hand navigation menu. Each scheduler defines how often maintenance should occur, which assets are involved, who is responsible, and what tasks need to be completed. Schedulers can be set to create plans (visible in the Plan List) or to generate jobs directly. Default schedulers follow predefined system rules, while custom schedulers give you full control over interval and trigger logic.
Video Tutorial
How to Create a Scheduled Maintenance
Step 1 – Navigate to Scheduled Maintenance
From the left-hand menu, click on Scheduled Maintenance. You will be taken to the Scheduled Maintenance listing page, where existing schedulers are displayed. Note that custom-built schedulers are editable, while default schedulers are non-editable.

Step 2 – Create a New Scheduler
Click the option to create a new scheduler. The scheduler creation page will open. Enter a name for the scheduler, then choose whether to create a plan (rather than generating individual jobs directly). Selecting "Create Plan Instead of Creating Jobs" means a maintenance plan will be generated and will appear in the Plan List for review.

Step 3 – Select the Schedule Type and Frequency
Select the schedule type. Two options are available:
- Default – The scheduler follows predefined frequency rules. Set the frequency (e.g., yearly, monthly, weekly) and the repeat interval. The start date is automatically filled with the current date, and the end date is calculated based on the selected duration.
- Custom – Allows you to define a specific interval value and start date, with additional trigger options (see the Custom Schedule section below).

Step 4 – Configure End and Overdue Settings
The scheduler end settings define when the schedule will stop generating plans or jobs. Any value defined here will override the related setting in the Dispatch Board Settings under System Configuration.
The overdue settings control how overdue work orders or jobs are highlighted. When a work order becomes overdue, it is highlighted in yellow in the list. Configure this setting based on how your team tracks overdue items.

Step 5 – Select Location and Add Description
Select the location for the scheduled maintenance. The title field will be prefilled automatically. Add a description if needed, then go to the Requested Details section and choose the relevant customer.
Step 6 – Assign Users
Navigate to the Assignee section and select the users you want to assign to this scheduled maintenance. You can select multiple assignees and they will all be linked to the scheduler.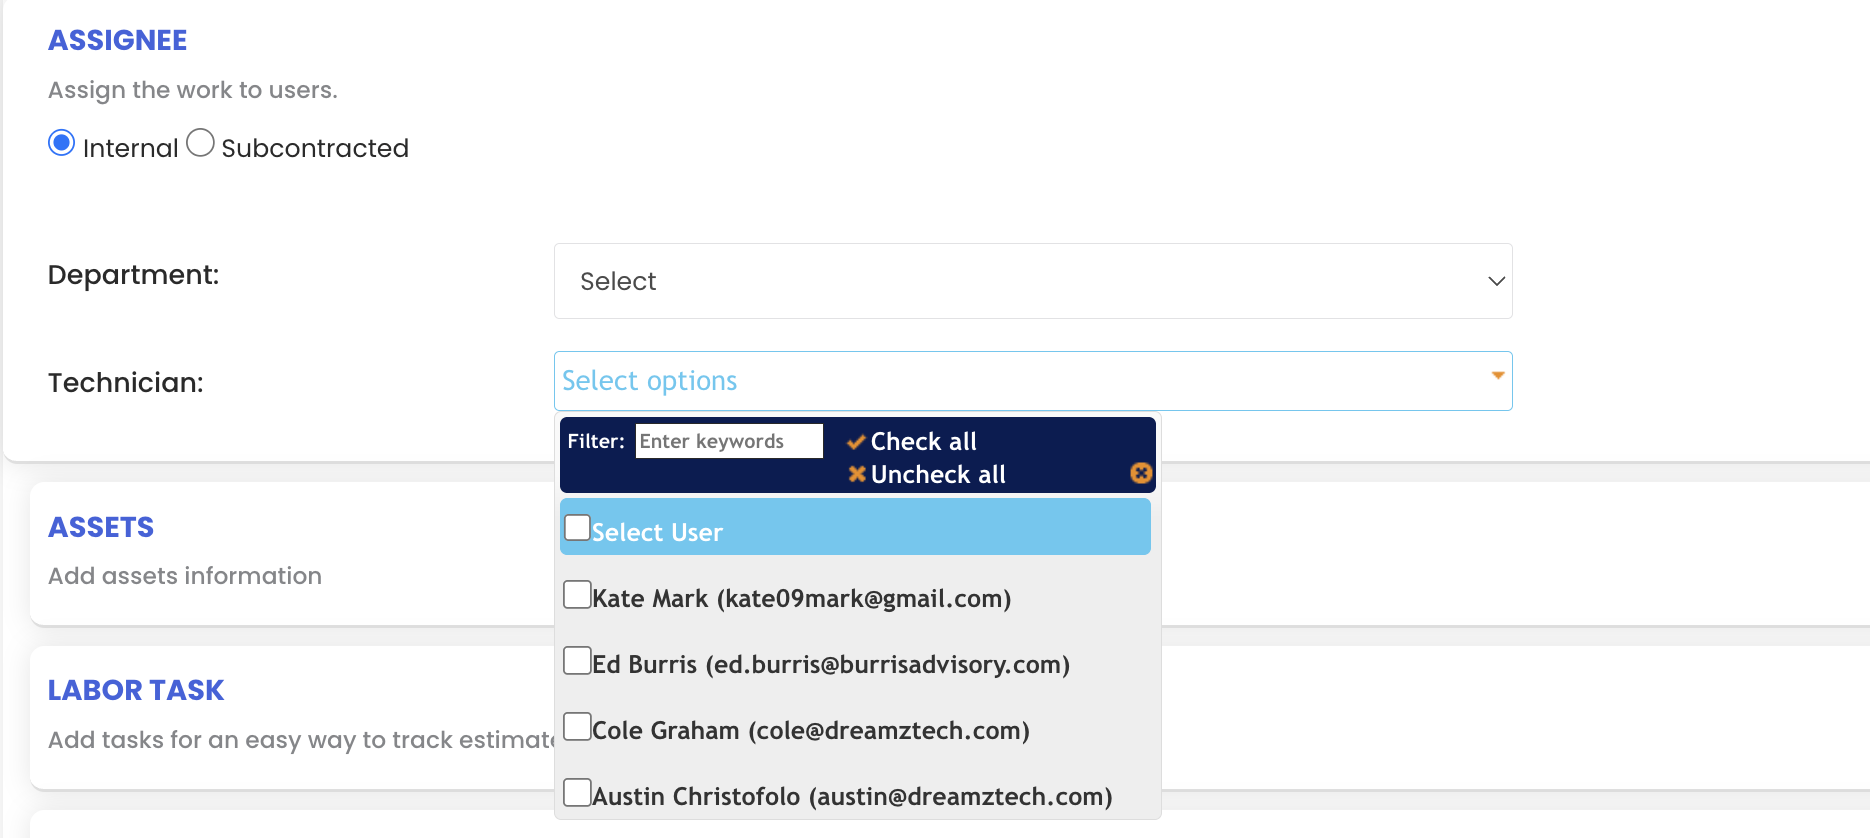
Step 7 – Add Assets
Go to the Assets section. The list of assets available for the selected location will be displayed. Select the required assets and add them to the scheduler.
Step 8 – Add Labour Tasks and Checklists
Navigate to the Labour Task section. Click the Labour Task Checklist option to view the list of checklists already created in the system. Select the relevant checklist and it will be added to the scheduler. You can then:
- Assign the checklist to specific assets from the assets you selected
- Assign the tasks to specific users from the assignee list
Click Add Tasks to confirm. The checklist and all its tasks will be added to the schedule.
Step 9 – Save the Scheduler
Scroll down and click Save. The scheduler will be added to the Scheduled Maintenance list with the name you provided.
Custom Schedule Settings
When the Custom schedule type is selected, additional trigger options become available that give you greater control over when jobs or work orders are created:
- Create First Job – If enabled, the first job is created on the selected start date itself. If disabled, the first job is created after the defined interval has elapsed from the start date.
- Create Next Job on Previous Job Close – If enabled, the next job is created immediately after the previous job or work order is closed. If disabled, the next job is created after the defined interval from the closing date of the previous job.
For example, if the interval is set to 3 days and the start date is the 30th: with "Create First Job" enabled, the first job is created on the 30th; without it, the first job is created on the 2nd (3 days after the 30th).
All other scheduler settings — including assets, checklists, assignees, and location — remain the same for custom schedules.
Viewing Plans from the Plan List
After saving a scheduler with "Create Plan Instead of Creating Jobs" selected, navigate to the Plan List. Multiple plans will have been automatically created based on the scheduler configuration. The Plan List offers three views:
- List View – Displays all plans in a tabular format
- Calendar View – Displays plans on a calendar, making it easy to track them over time
- Bird View – Provides a broad overview of all plans, with the option to generate work orders directly from this view

PM Scheduler Notifications
DreamzFSM supports automated notifications for scheduled maintenance. Under System Configuration > General Tab, you will find the PM Scheduler Notification setting. When enabled, the system will automatically send a notification to the assigned users a specified number of days before the scheduled due date. For example, if set to 7 days, users will be notified one week before the maintenance is due.
Tips for Scheduled Maintenance
- Use "Create Plan Instead of Creating Jobs" when you want to review and approve maintenance before work orders are generated — this gives you more control over your maintenance pipeline.
- Use the Custom schedule type for maintenance activities that depend on the completion of the previous job, such as condition-based or reactive-preventive maintenance.
- Enable PM Scheduler Notifications to ensure assignees are alerted in advance, reducing the risk of missed maintenance windows.
- Use the Bird View in the Plan List for a quick overview of all upcoming plans and to bulk-generate work orders when ready.
- Assign checklists to specific assets within the scheduler to ensure each asset receives the correct set of maintenance tasks, rather than applying a single checklist to all assets.
- Review your overdue settings to ensure your team can quickly identify and prioritise overdue maintenance tasks in the list.
Frequently Asked Questions
What is the difference between Default and Custom schedule types?
Default schedules follow predefined frequency rules such as daily, weekly, monthly, or yearly. Custom schedules allow you to define a specific interval and configure exactly when the first job is created and when subsequent jobs are triggered relative to the previous job's completion.
What does "Create Plan Instead of Creating Jobs" mean?
When this option is selected, the scheduler generates maintenance plans rather than individual jobs directly. These plans appear in the Plan List and can be reviewed before being converted into work orders.
Why are some schedulers non-editable?
Default system schedulers are non-editable. Only custom-built scheduled maintenance plans can be edited after creation.
Can I assign checklists to specific assets within a scheduler?
Yes. After adding assets and selecting a checklist in the Labour Task section, you can assign the checklist to individual assets and specific users from the assignee list.
Can I generate work orders from the Plan List?
Yes. From the Bird View in the Plan List, you can generate work orders directly for the plans that are ready to be actioned.
How do I set up maintenance notifications?
Navigate to System Configuration and open the General tab. Enable the PM Scheduler Notification setting and specify how many days before the due date the notification should be sent.
Related Articles
- Create and Manage Jobs
- Create and Manage Work Orders
- Assign Jobs to Technicians
- How to Manage Various Asset Information
- Create Asset Locations